User Guide
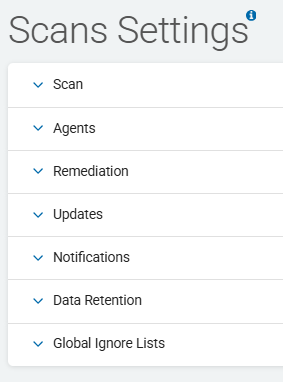
Scans Settings
Overview
Scans Settings is where you manage your settings for:
-
Scan Item Number and Load
-
Target Preferences
-
Remediation Settings
-
Policy and Application Updates
-
Notifications and Custom Notifications
-
Data Retention
Note: Changes to Scans Settings take effect the moment data is entered into any field.
If you wish to retain a copy of the original settings when making updates if you need to revert back to the previous settings.
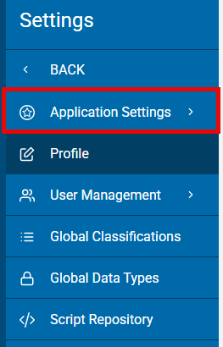
Access Scan Settings
To access the Scan Settings screen, use the following steps:
-
From the left menu, click Settings.

-
Click Application Settings.
-
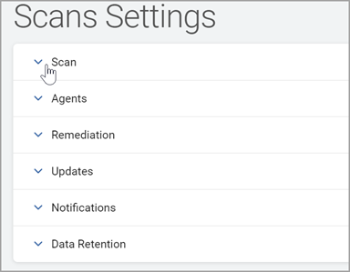
To view sections in Scans Settings:
-
Click a down arrow to expand a section.
-
Click an up arrow to collapse a section.
-
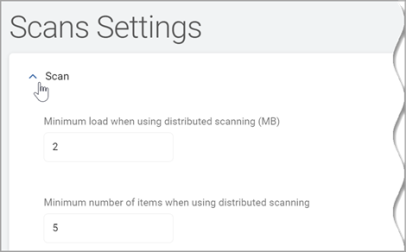
Manage Scan Settings
To manage Scan Settings, use the following steps:
-
Click the down arrow to expand the section.
-
Fill in the following settings - note that only some of these settings apply to greyhound agents (v13.0 and later):
-
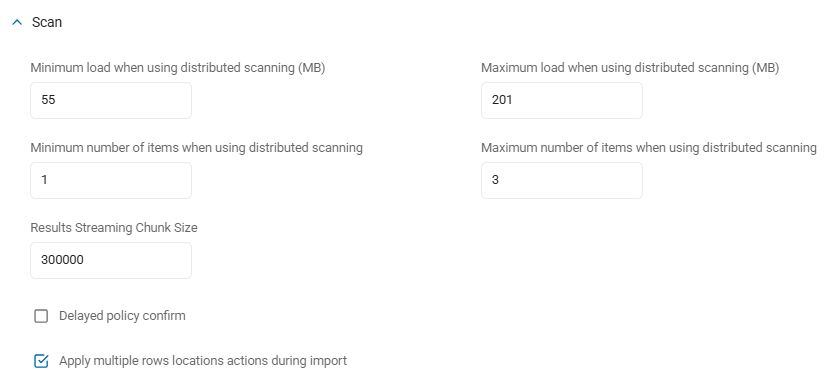
Minimum Load When Using Distributed Scanning (MB): When using Discovery Teams to scan a target, this is the minimum amount of data, in megabytes, that is assigned to each Discovery team member.
-
Amount of data from all targets is calculated and split into data sets, with no data set being less than the value of the minimum load unless the size of a data set is less than the value in the minimum load - it cannot be grouped with any other data sets, in which case a team member is assigned a data set smaller than the minimum load.
-
This setting is used only when load balancing is enabled.
-
These limits apply only to Sensitive Data Manager (SDM) agents (versions 12.6.1 and earlier), NOT greyhound agents (versions 13.0+)
-
Valid values: 0-999,998
-
Value of 0 disables this setting
-
Default: 2
-
-
Minimum Number of Items When Using Distributed Scanning: When using the minimum number of items while using distributed searching, this is the minimum amount of items that can be assigned.
-
These limits apply only to Sensitive Data Manager (SDM) agents (versions 12.6.1 and earlier), NOT greyhound agents (versions 13.0+)
-
Valid values: 0-999,999
-
Default: 20,000
-
-
Maximum Load When Using Distributed Scanning (MB): When using Discovery Teams to scan a target, this is the maximum amount of data, (in megabytes), that a team member scans.
-
The amount of data from all targets is calculated and split into data sets, with no data set exceeding the value of the maximum load - unless a single folder exceeds the value of the maximum load in which case that folder is not divided and is searched by a single team member.
-
These limits apply only to Sensitive Data Manager (SDM) agents (versions 12.6.1 and earlier), NOT greyhound agents (versions 13.0+)
-
Valid values: 1-999,999
-
Default: 5
-
-
Maximum Number of Items When Using Distributed Scanning: When using the maximum number of items while using distributed searching, this is the maximum number of items that can be assigned.
-
These limits apply only to Sensitive Data Manager (SDM) agents (versions 12.6.1 and earlier), NOT greyhound agents (versions 13.0+)
-
Valid values: 0-999,999,999
-
Default value: 100,000
-
-
Results Streaming Chunk Size: The size of the data chunks the agent sends to RabbitMQ as it is scanning, up to the max value set.
-
Default: 300000 (bytes)
-
Applies only to greyhound agents (versions 13.0+)
-
-
Delayed policy confirm: When this setting is disabled (not checked), which is the default setting, policies are processed, made available to the agent, and then applied by the agent.
-
The agent then reports the policy state to the Console and the agent can then request additional policies.
-
Policy confirmation is a resource intensive process and may lock agents or other service tasks, causing a negative performance impact.
-
If that happens, this setting should be enabled and the confirmation is executed by the Update Policy States service task at a later time instead of when an agent reports it.
-
Enabling this setting lowers the pressure on resources, but it does not prevent agents from checking for new policies.
-
If this setting is enabled, policies are still processed, made available to the endpoint and then applied by the endpoint.
-
However, there is no confirmation that the policy has been applied by the endpoint.
-
The Policies State on the Status tab shows as 'Pending Confirm'.
-
The Update Policy State service job needs to be executed to update this state.
-
When the setting "Delayed Policy Confirm" is enabled, the state 'Pending Confirm' is set for an agent after the agent confirms it policies.
-
The state clears after the service job has executed.
-
The setting should be enabled if the Console is experiencing problems with deadlocks or timeouts.
-
-
Apply multiple rows locations actions during import: If an action (shred, redact, quarantine, Restrict Access, ignore), has been applied to a location on the agent, when the action is reported to the Console during import the Console searches for all previously imported search results of this location and applies the same action to those search results.
-
In normal operations Spirion recommends this setting remain enabled (default).
-
If you find imports are taking an excessively long time to complete or there are timeouts occurring in the Server Service log, including Apply Multi Row Location Actions in the text of the exception details, then you may disable this setting.
-
Disabling this setting accelerates results being imported into the Console database by applying the action only to the currently imported results and not to any previously imported results.
-
Default: Enabled.
Note: If a distributed scan does not complete when run against a very large data set, set the thresholds to a minimum of 5 MB and a maximum of 10 MB and re-run the scan.
Contact your Customer Success Manager if you have any questions. -
-
Manage Agents Settings
To manage Agents settings:
- Click the down arrow to expand the Agents section.
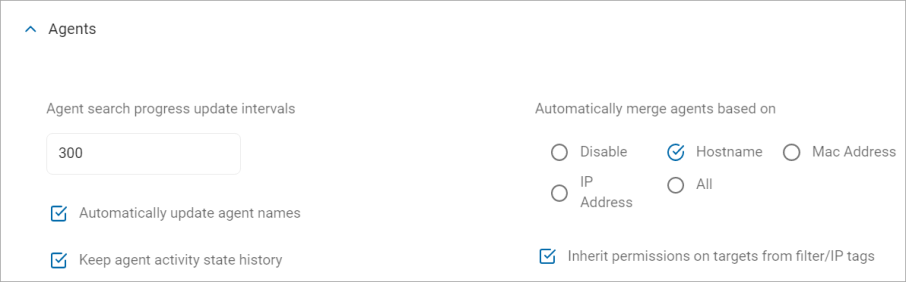
- Complete the following settings:
-
Agent search progress update intervals:
- Enter an interval (in seconds) for Agents to send search progress updates to the console.
- Minimum value: 60 (seconds)
- If a value less than 60 is entered, the value is automatically changed to 60 the moment you click elsewhere on the page or select another page
- Enabled by default
- Default value: 300 (seconds)
-
Automatically update agent names:
When enabled, the Console automatically updates the agent display name and host name when an agent's computer name changes.
Disabled by default
Computer name is communicated to the Console during initial agent registration and when search results are sent to the Console.
When the Console processes the results for an agent, if the name provided with the agent GUID is different than the name stored in the database, the agent name is updated to the new name, (if this setting is enabled).
-
Keep Agent Activity State History:
When enabled, the Console records the various agents' states.
The maximum states to keep determines how many states are recorded per agent.
Agent states are statuses, such as when the agent is opened or closed, or when a search was started, paused, canceled or completed interactively.
Agent statuses do not include states related to tasks which are initiated from the Console, or via a scheduled task policy.
-
Automatically merge agents based on:
- When enabled, the Console automatically merges agents that have any or all of the specified criteria in common
- By default, all radio buttons are cleared and automatic agent merging is disabled
- Select one of the following options:
- Disable - Disables automatic agent merging
- Hostname - The hostname is generally the computer name assigned by the OS to an agent
- Mac Address - The Console tracks all MAC addresses for agents. As with IP addresses this also includes MAC addresses from all physical and virtual network adapters
- IP Address - The Console tracks all IPv4 addresses for agents. This includes all physical and virtual network adapters
- All - Includes Hostname, Mac Address, and IP Address
-
Inherit permissions on targets from filter/IP tags:
When enabled, if you create a role that has only permissions to a filtered/IP tag, that role also has permissions to the Targets within that filtered/IP tag.
Enabled by default.
When this setting is disabled and you create a role that only has permissions to a filtered/IP tag, the role does not have permissions to the Targets within that filtered/IP tag.
To enable the role to have permissions to the Targets within the filtered/IP tag when the setting is disabled, you must also grant permissions for the role to a simple tag that contains the same endpoint within the filtered/IP tag or grant permission to the endpoint explicitly.
Manage Remediation Settings
Overview
To manage Remediation settings, use the following steps:
- Click the down arrow to expand the Remediation section.
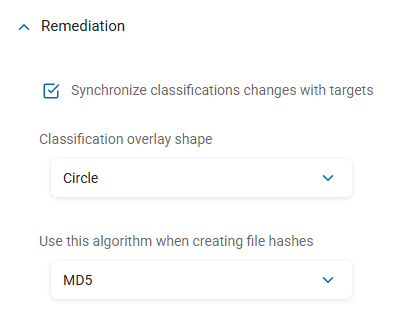
- Complete the following fields:
- Synchronize Classification Changes With Targets:
- Enabled: Manual classification changes made to sensitive data matches on the Scan Results page of the Spirion console are synchronized with the endpoint (target).
This service task synchronizes the classifications between the database and agent.
For example, a "Public Classification" applied to a SSN number match in the Results page of the Console displays on the file in the Agent (using the Synchronize Classifications service task).
Disabled: No synchronization is performed
- Enabled: Manual classification changes made to sensitive data matches on the Scan Results page of the Spirion console are synchronized with the endpoint (target).
- Classification Overlay Shape:
The shape of the classification overlay that displays when the setting "Display Classification Icons" is disabled or when there are no icons loaded for a classification.
Options:
Circle (default)
Square
- Use This Algorithm When Creating File Hashes:
When using file hashes for Global Ignore Lists or adding file hashes to search locations in a policy, it is possible to specify the algorithm to be used for the hashing.
Changing this setting after hashes have been created invalidates any existing hashes.
The Console and all endpoints must be configured, in unison, to use the same file hashing algorithm.
The hash algorithm can be specified for endpoints with the following policy setting: Settings\Actions\Ignore\FileHash
Default algorithm: MD5
Quarantine Settings
Note: Global configurations can be overridden by Playbook quarantine locations.
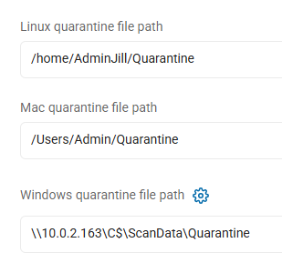
Linux Quarantine File Path
Enter the Linux location to quarantine the files.
-
Local Agent machine, all files: <path>/<Quarantine_Folder>
-
Example: /home/AdminBob/Quarantine
-
This entry quarantines all files to the specified Linux folder on the local Agent machine
-
-
Mounted machine, all files: mnt/Quarantine
-
This entry quarantines all files to the specified quarantine folder on the specified mounted machine
-
-
Remote machine, all files: \\<IP_address>\<drive_letter>$\<Quarantine_Folder>
-
Example: \\10.0.2.163\c$\Quarantine
-
This entry quarantines all files to the specified path on the specified remote Windows machine
Note: The file path syntax for Linux and Mac is different from that of Windows. The '\' character in Windows is represented as '/' in Linux/Mac.
-
Mac Quarantine File Path
Enter the Mac location to quarantine the files.
- Local Agent machine, all files: <path>/<Quarantine_Folder>
- Example: /Users/Admin/Quarantine
- This entry quarantines all files to the specified Mac quarantine folder on the local Agent machine
- Remote machine, all files: \\<IP_address>\<drive_letter>$\<Quarantine_Folder>
- Example: \\10.0.2.163\c$\Quarantine
- This entry quarantines all files to the specified path on the specified remote Windows machine
Windows Quarantine File Path
Enter the local or remote Microsoft Windows location to quarantine the files.
- Local Agent machine, all files: <Drive_Letter>:\<Quarantine_Folder>
- Example: C:\ScanData\Quarantine
- This entry quarantines all files to the specified Windows drive (C:) and folder on the local Agent machine
- Remote machine, all files: \\<IP_address>\<drive_letter>$\<Quarantine_Folder>
- Example: \\10.0.2.163\c$\Quarantine
- This entry quarantines all files to the specified path on the specified remote Windows machine
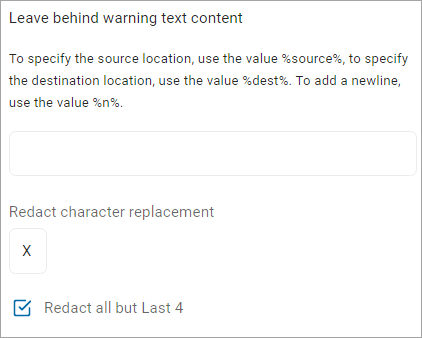
Leave Behind Warning Text Content
-
Enter a text message that displays on files specifying the reason of quarantine.
Redact Character Replacement
-
Enter the character you want to use in place of the text you are redacting.
Redact all but Last 4
-
Select, if applicable.
Note: Global quarantine configurations for cloud locations are mostly done with the admin accounts.
Also, global configurations can be overridden by Playbook quarantine locations.
Amazon S3 Quarantine File Path
Specify the default folder to use for quarantining files discovered in an Amazon S3 cloud location.
-
This setting can be a single location or a list of locations, entered one per line.
-
Each item in the list must be specifically formatted to include the <path>, <user> (optional), and/or <admin> (admin account optional)
-
<user> is a specified S3 user account to the specified S3 location
-
<admin account> (optional) is an administrative account on S3 defined in the cloud storage configuration.
-
If the admin account is not included, the path applies to all administrative accounts defined in the configuration.
-
-
Supported Paths
-
Only cloud storage paths (as they appear in results without a file name)
-
Examples
Examples of quarantine paths for local and cloud destinations, in valid formats, are listed below:
-
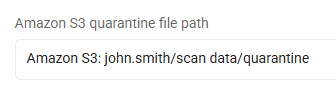
Amazon S3, all files: Amazon S3: user/Quarantine_Folder
-
This entry quarantines all files on this cloud provider to the specified Amazon S3 quarantine folder
-
-
Amazon S3, admin user files only: Amazon S3: user/Quarantine_Folder,admin@domain.com
-
This entry quarantines only files in the specified admin account on this cloud provider to the specified Amazon S3 quarantine folder
-
Box Quarantine File Path
Specify the default folder to use for quarantining files discovered in a Box cloud location.
-
This setting can be a single location or a list of locations, entered one per line.
-
Each item in the list must be specifically formatted to include the <path>, <user> (optional), and/or <admin> (admin account optional)
-
<path> is any valid path
-
<user> is a specified Box user account to the specified Box location
-
<admin account> (optional) is an administrative account on Box Sync defined in the cloud storage configuration.
-
If the admin account is not included, the path applies to all administrative accounts defined in the configuration.
-
-
Supported Paths
-
Only cloud storage paths (as they appear in results without a file name)
-
Standard file system paths
-
Examples
Examples of quarantine paths for local and cloud destinations, in valid formats, are listed below:
-
Local Agent machine, all files: E:\Quarantine_Folder
-
This entry quarantines all files on this cloud provider to this local folder (E:\Quarantine_Folder) on the local agent
-
-
Local Agent machine, admin user files only: E:\Quarantine_Folder,admin@domain.com
-
This entry quarantines only files in the specified admin account on this cloud provider to this folder (E:\Quarantine_Folder) on the local agent
-
-
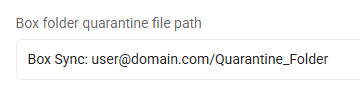
Box, all files: Box Sync: user@domain.com/Quarantine_Folder
-
This entry quarantines all files on this cloud provider to the specified Box Sync folder
-
-
Box, admin user files only: Box Sync Admin: user@domain.com/Quarantine_Folder,admin@domain.com
-
This entry quarantines only files in the specified admin account on this cloud provider to the specified Box Sync folder
-
Dropbox Quarantine File Path
Specify the default folder to use for quarantining files discovered in a Dropbox cloud location.
-
This setting can be a single location or a list of locations, entered one per line.
-
Each item in the list must be specifically formatted to include the <path>, <user> (optional), and/or <admin> (admin account optional)
-
<path> is any valid path
-
<user> is a specified Dropbox user account to the specified Dropbox location
-
<admin account> (optional) is an administrative account on Dropbox Sync defined in the cloud storage configuration.
-
If admin account is not included, the path applies to all administrative accounts defined in the configuration.
-
-
Supported Paths
-
Only cloud storage paths (as they appear in results without a file name)
-
Standard file system paths
-
Examples
Examples of quarantine paths for local and cloud destinations, in valid formats, are listed below:
-
Local Agent machine, all files: E:\Quarantine_Folder
-
This entry quarantines all files on this cloud provider to the specified drive and folder (E:\Quarantine_Folder) on the local agent
-
-
Local Agent machine, admin user files only: E:\Quarantine_Folder,admin@domain.com
-
This entry quarantines only files in the specified admin account on this cloud provider to the specified drive and folder (E:\Quarantine_Folder) on the local agent
-
-
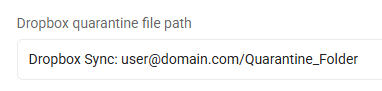
Dropbox, all files: Dropbox Sync: user@domain.com/Quarantine_Folder
-
This entry quarantines all files on this cloud provider to the specified Dropbox Sync folder
-
-
Dropbox, admin user files only: Dropbox Sync: user@domain.com/Quarantine_Folder,admin@domain.com
-
This entry quarantines only files in the specified admin account on this cloud provider to the specified Dropbox Sync folder
-
Microsoft OneDrive Quarantine File Path
Specify the default folder to use to quarantine files discovered in a Microsoft OneDrive cloud location.
-
This setting can be a single location or a list of locations, entered one per line.
-
Each item in the list must be specifically formatted to include the <path>, <user> (optional), and/or <admin> (admin account optional)
-
<path> is any valid path to the files to be quarantined
-
<user> is a specified OneDrive user account to the specified OneDrive location
-
<admin account> is an administrative account on OneDrive defined in the cloud storage configuration.
-
If the admin account is missing, the path applies to all administrative accounts defined in the configuration.
-
-
-
Supported Paths
-
Cloud storage paths (as they appear in results without a file name)
-
Standard file system path
-
Examples
Examples of quarantine paths for local and cloud destinations, in valid formats, are listed below:
-
Local Agent machine, all files: E:\Quarantine_Folder
-
This entry quarantines all files on this cloud provider to the specified drive and folder (E:\Quarantine_Folder) on the local agent
-
-
Local Agent machine, admin user files only: E:\Quarantine_Folder,admin@domain.com
-
This entry quarantines only those files in the specified admin account on this cloud provider to the specified drive and folder (E:\Quarantine_Folder) on the local agent
-
-
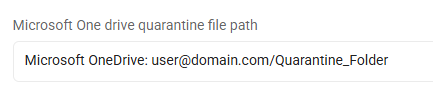
OneDrive, all files: OneDrive For Business: user@domain.com/Quarantine_Folder
-
This entry quarantines all files on this cloud provider to the specified Microsoft OneDrive for Business quarantine folder
-
-
OneDrive, admin user files only: OneDrive For Business: user@domain.com/Quarantine_Folder,admin@domain.com
-
This entry quarantines only files in the specified admin account on this cloud provider to the specified Microsoft OneDrive for Business quarantine folder
Note: To quarantine files to Microsoft OneDrive, the entire location file path must be written in lowercase.
-
Google Drive Quarantine File Path
Specify the default folder to use to quarantine files discovered in a Google Drive cloud location.
-
This setting can be a single location or a list of locations, entered one per line.
-
Each item in the list must be specifically formatted to include the <path>, <user> (optional), and/or <admin> (admin account optional)
-
<path> is any valid path
-
<user> is a specified Google user account to the specified Google location
-
<admin account> is an administrative account on Google Drive defined in the cloud storage configuration.
-
If the admin account is missing, the path applies to all administrative accounts defined in the configuration.
-
-
Supported Paths
-
Cloud storage paths (as they appear in results without a file name)
-
Standard file system path
-
Examples
Examples of quarantine paths for local and cloud destinations, in valid formats, are listed below:
-
Local Agent machine, all files: E:\Quarantine_Folder
-
This entry quarantines all files on this cloud provider to the specified drive and folder (E:\Quarantine_Folder) on the local agent
-
-
Local Agent machine, admin user files: E:\Quarantine_Folder,admin@domain.com
-
This entry quarantines only those files in the specified admin account on this cloud provider to the specified drive and folder (E:\Quarantine_Folder) on the local agent
-
-
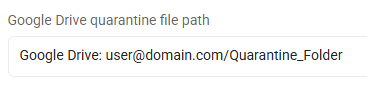
Google Drive, all files: Google Drive: user@domain.com/Quarantine_Folder
-
This entry quarantines all files on this cloud provider to the specified Google Drive quarantine folder
-
-
Google Drive, admin user files only: Google Drive: user@domain.com/Quarantine_Folder,admin@domain.com
-
This entry quarantines only those files in the specified admin account on this cloud provider to the specified Google Drive quarantine folder
-
SharePoint Quarantine File Path
Enter the SharePoint location to quarantine the files.
Note: Quarantining SharePoint files to a remote file server is not supported at present.
- Local Agent machine: <Drive_Letter>:\Quarantine_Folder
- Example: C:\SharePointQuarantine
- This entry quarantines all files to the specified drive (C:) and quarantine folder on the local Agent machine
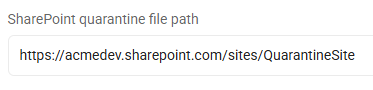
- SharePoint site: https://<SharePoint_site>/QuarantineSite
- Example: https://acmedev.sharepoint.com/sites/QuarantineSite
- This entry quarantines all files to the specified SharePoint site quarantine folder on the specified remote SharePoint quarantine site
Bitbucket Quarantine File Path
Bitbucket is not currently supported.
Microsoft Information Protection

Procedure:
-
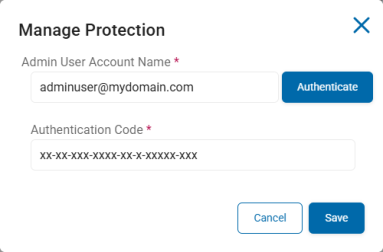
Next to Manage Protection (Authenticated), click Manage.
-
The Manage Protection window opens.
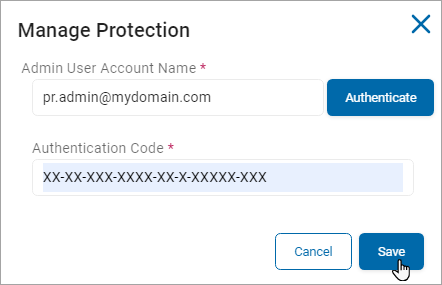
In the Manage Protection window, enter these settings:
-
Admin User Account Name: Enter your admin user account name and click Authenticate.
-
Authentication Code: Enter your authentication code provided from the authentication above in the box.
-
Client ID: (Optional) Enter your unique client ID to be used for authentication.
-
Client Secret: (Optional) Enter your unique client secret to be used for authentication.
-
Tenant ID: (Optional) Enter your tenant ID to be used by the authenticating server.
-
Click Save to save or Cancel to discard.
Note: If you enter value in any of the optional fields, it is mandatory to add values in the other optional fields as well.
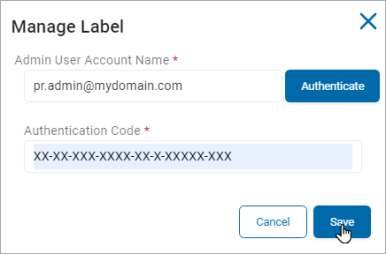
In the Manage Label (Authenticated) section, do the following:
-
Click Manage.

In the Manage Label pop-up window, fill in the following:
-
Admin User Account Name: Enter your admin user account name (user@domain.com) and click Authenticate.
-
Authentication Code: Enter your authentication code provided from the authentication above in the box.
-
Client ID: Enter your unique client ID to be used for authentication.
-
Client Secret: Enter your unique client secret to be used for authentication.
-
Tenant ID: Enter your tenant ID to be used by the authenticating server.
-
Click Save to save or Cancel to discard.
Manage Updates Settings
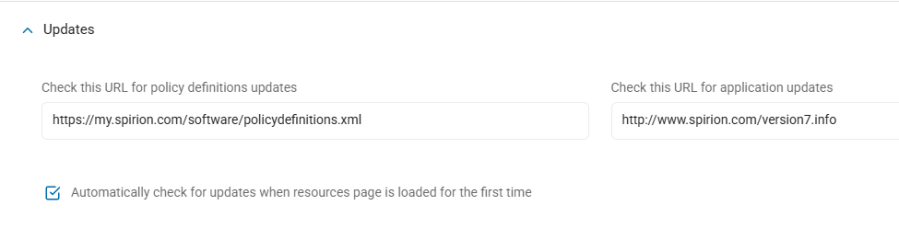
Use the following steps to manage your Updates settings:
-
Click the down arrow to expand the section.
-
Check This URL for Policy Definitions Updates: Enter the URL that hosts your Policy Definitions.
-
Automatically Check for Updates When Resources Page is Loaded for the First Time: Select, if applicable.
-
Check This URL for Application Updates: Enter the URL that hosts your Application Updates.
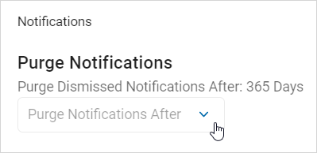
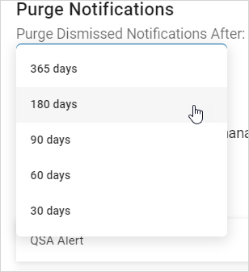
Manage Notifications Settings
To manage Notifications Settings:
- On the left of the Notifications row, click the down arrow to expand the section.
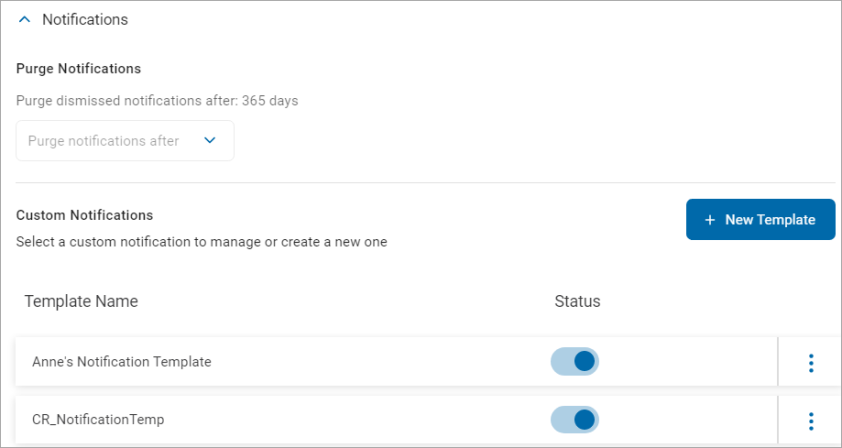
- In the Purge Notifications section, select an option from the "Purge Dismissed Notification After" drop-down list.
- In the Custom Notification section, you can manage existing custom notifications or create new ones.
Manage a Custom Notification
To manage custom notifications, use the following steps:
- Locate a template in the list.
- Use the toggle to change the deployed status.
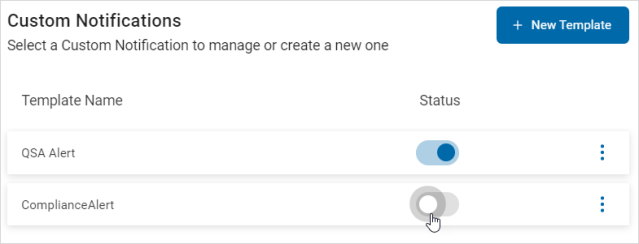
- To manage a template, click the more options menu.

- Click Manage.
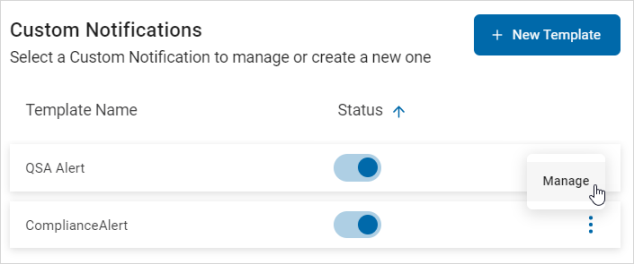
- In the Manage Custom Notification pop-up window, make needed changes.
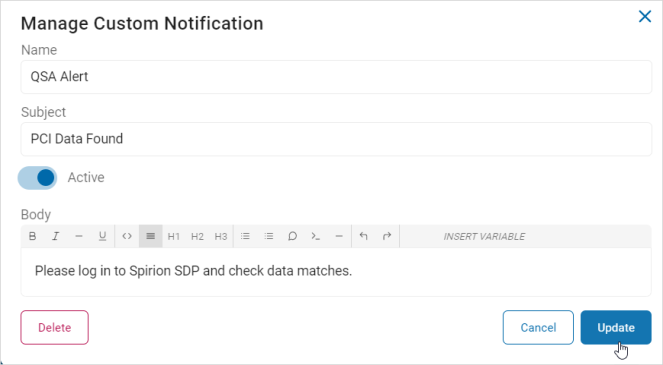
- Click Update to save updates, Cancel to discard updates, or Delete to delete the template.
Note: If you click the Delete button, it immediately deletes the template. There is no undo feature.
How to Create a New Template
Procedure:
- In the Custom Notifications section, click New Template.

- In the Create Custom Notification pop-up window, fill in the following:
- Name: Enter the template name.
- Subject: Enter a description of the template subject.
- Active: Use the toggle to change the Active status.
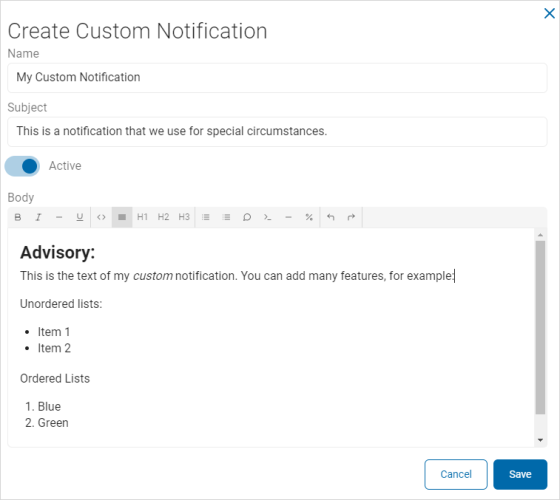
- Body: Use the text editor to compose the body of the template.
- Use the toolbar to format the text and paragraphs, and to insert code and variables as needed.
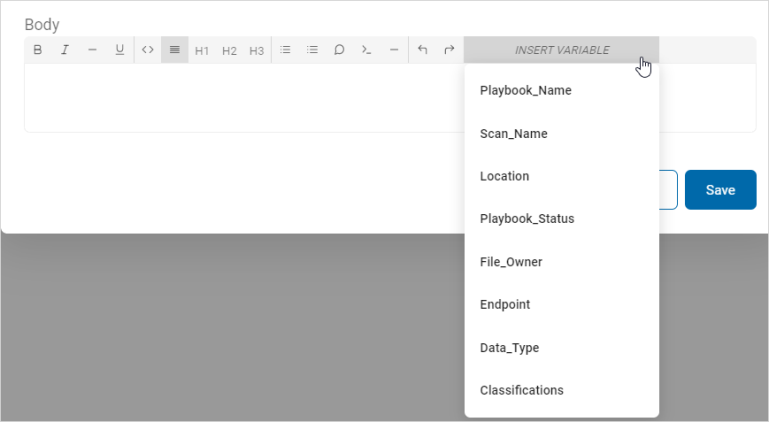
- Use the toolbar to format the text and paragraphs, and to insert code and variables as needed.
- Click Save to save the template or Cancel to discard.
Manage Data Retention Settings
To manage your Data Retention settings, fill in the following fields:
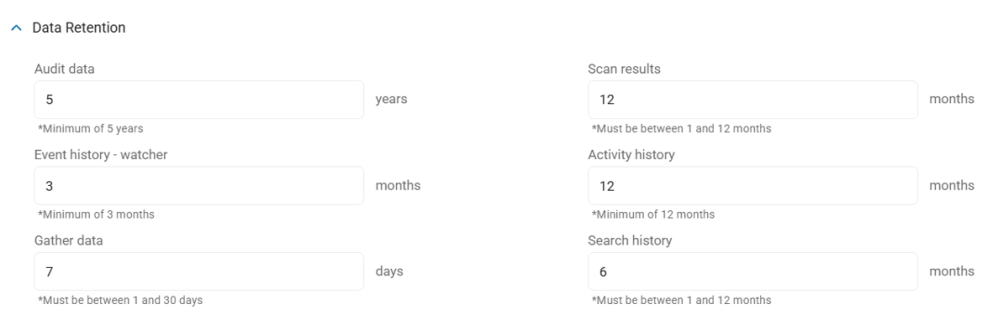
- Audit Data Retention:
- Set the number of years to retain data.
- A minimum of 5 years is required.
- Event History - Watcher:
- Set the number months to retain Watcher Event history, if applicable.
- Gather data:
- Set the number of days to gather data.
- This number must be between 1 and 30 days.
- Scan results:
- Set the number of months of scan results to retain.
- This number must be between 1 and 12 months.
- Activity History:
- Set the number of months of Incident history to retain.
- A minimum of 12 months is required.
- Search History
- Set the number of months of scanned location history to retain when using Differential Scanning.
- Also see What is Differential Scanning?
- After this set number of months, search history data is purged (deleted).
- This number must be between 1 and 12 months.
- Set the number of months of scanned location history to retain when using Differential Scanning.
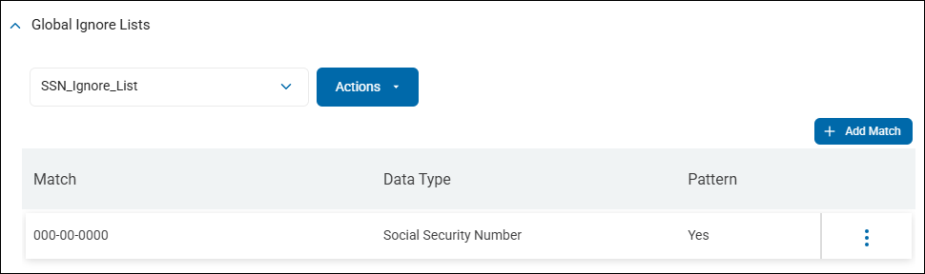
Global Ignore Lists
Sensitive Data Platform version 13.6 introduces the Global Ignore List feature.
NOTE: The Global Ignore Lists section under Settings>Application Settings>Scans Settings appears only for users who are members of the Admin user role. All other user roles cannot view or use this feature.
Ignore Versus Exclude
Before using the Global Ignore List feature consider whether you want to Ignore or Exclude the sensitive data you are scanning for in your environment.
-
Ignore - Global Ignore List: The sensitive data matches (credit card numbers, social security numbers, personal addresses, etc.) that are entered into the Global Ignore List are scanned by Spirion Agents, along with all sensitive data, but the Agent is instructed to ignore the data.
-
Data marked Ignored does not appear in scan results, reports, or any Sensitive Data Platform dashboards
-
Note that the Ignore setting available from Playbooks differs from the Ignore performed by the Global Ignore List
-
-
Exclude: Sensitive data matches that should be skipped (not scanned by Spirion Agents), must be set to Exclude.
-
No identification or action of any kind can be applied to the data as it is identified and skipped by Spirion agents during the scanning process.
-
The sensitive data to exclude is defined when you set up the scan (within the Sensitive Data Platform UI, Scans>All Scans>+Add Scan). See User Guide.
-
To see information about excluding files or folders, see How to Create a Files & Folders Scan
-
What is Global Ignore?
Sensitive Data Matches such as social security numbers, or credit card numbers, etc., can be included in a Global Ignore List. Scans performed by Spirion Agents capture the sensitive data matches, but ignore them. The Sensitive data matches are not sent to the Sensitive Data Platform console and therefore are not visible in scan results, reporting, or dashboards.
This feature is useful to eliminate false positives - sensitive data matches which exist, but are considered invalid, because they are provided for context, examples, samples, training, or other means:
-
Example birth dates
-
Sample social security numbers
-
Fictitious credit card numbers
Example
A sample piece of data provided on a form, such as a date of birth, which is always scanned, should be included in a Global Ignore List so that it does not register as a valid sensitive data match.
How to Use Global Ignore Lists
When you create a Global Ignore List with sensitive data matches, when Spirion Agents scan your data sources (Targets) any sensitive data discovered that matches an item in your Global Ignore List is ignored. The sensitive data match will not appear in reports, dashboards, or scan results.
-
A Global Ignore List can contain either singular instances of unique data types or multiple instances of a data type captured using pattern-matching.
-
For example, you may wish to ignore the social security number 000-00-0000 as it is an invalid number.
When and How to Use Pattern Matching
-
Pattern matching is done under the MATCHES tab
-
Pattern matching is used to identify all sensitive data matches which meet the pattern criteria you set.
-
Includes the AnyFind, Sensitive Data Definitions (SDD), and Search API identity types as options. See below:
-
ABN
-
Australia: TFN
-
Bank Account Number
-
Canada: SIN
-
Credit Card Number
-
Date of Birth
-
Dictionary
-
Driver's License
-
E-Mail Address
-
File Hash
-
Health Information
-
IMEI
-
Keyword
-
Mother's Maiden Name
-
Passport Number
-
Password
-
Personal Address
-
Regular Expression
-
Social Security Number
-
Tax Search
-
Telephone Number
-
United Kingdom: NHS
-
United Kingdom: NINO
-
-
Enabling the Pattern checkbox enables you to use a Regular Expression to match search results rather than matching a specific value.
-
Example: In your environment, you have sample forms on your computer that use many different placeholders for completing Social Security forms, but they all begin with the number sequence 123-12. Enter the pattern ^123\-12 in the Match field and select Social Security Number as the Data Type to prevent the placeholder numerals from being displayed in search results, reports, or dashboards.

Location Matching
-
Location matching is done under the LOCATIONS tab.
-
Location matching is used to identify all sensitive data matches which meet the location criteria you set.
-
Locations in Spirion Sensitive Data Platform are full path to files, such as c:\Passwords\SensitivePasswords.txt.
-
Available Locations include files from cloud, email, database, collaboration tools such as SharePoint, and web types. See below:
-
Cloud e-mail attachment
-
Exchange Online
-
Gmail
-
-
Cloud e-mail message
-
Cloud storage
-
Database table
-
File
-
Firefox Browser Data
-
Internet Explorer Browser Data
-
MBOX Attachment
-
MBOX File E-mail Message
-
Microsoft Exchange Attachment
-
Microsoft Exchange E-mail Message
-
NoSQL Document
-
Outlook Attachment
-
Outlook E-mail Message
-
SharePoint
-
Thunderbird Attachment
-
Thunderbird E-mail Message
-
Web Page
-
Windows Mail or Outlook Express Attachment
-
Windows Mail or Outlook Express E-Mail Message
-
Windows Registry
-
-
Example: In your environment, you have sample forms on your computer that use many different placeholders for completing Social Security forms, but they all begin with the number sequence 123-12. Enter the pattern ^123\-12 in the Match field and select Social Security Number as the Data Type to prevent the placeholder numerals from being displayed in search results, reports, or dashboards.
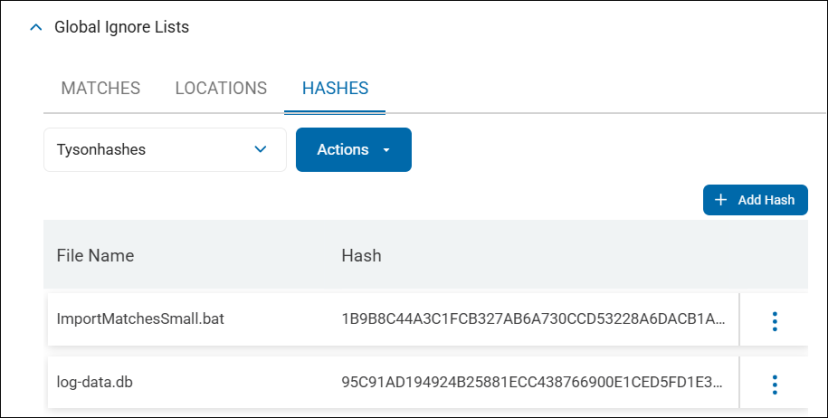
Hash Matching
-
Hash matching is done under the HASHES tab.
-
For every uploaded file the file name and hash for the file is displayed
-
Hash matching is used to identify all sensitive data which match the hash (specific version of a file) you upload.
-
Example: In your environment, you have a file of a specific date and version on a machine which can always be ignored by Spirion Agents during scanning. Upload the file to generate a hash identifying this specific file to prevent it from ever being displayed in search results, reports, or dashboards.
-
How to Edit a Hash File
To edit an uploaded hash file, use the following steps:
-
Select the vertical 3 dot more options menu and select Edit from the drop-down menu that appears.
-
The Edit Hash dialog appears.
-
Click the upload icon to upload a different version of the file (which is used by Spirion Sensitive Data Platform to generate a different hash).
How to Add a Global Ignore List
The following steps can be used for all types of Global Ignore Lists - Matches, Locations, and Hashes.
Use the following procedure to create a new Global Ignore List.
-
Select the appropriate tab where you want to create your list - MATCHES, LOCATIONS, or HASHES.
-
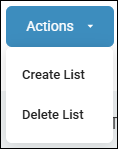
Click the blue Actions button and select Create List from the drop-down menu.
-
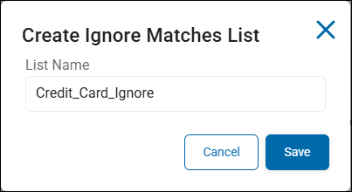
The "Create Ignore Matches/Locations/Hashes List" dialog appears.
-
Enter a descriptive name for the Ignore list that indicates what the list will contain.
-
Click Save.
-
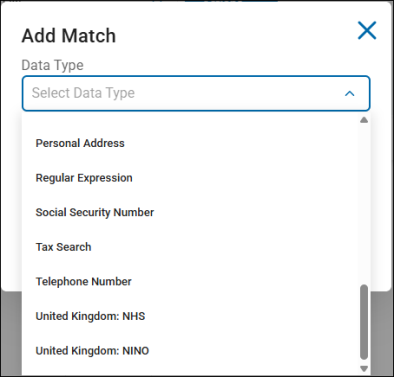
Add Match
-
To add a match by data type, click the Add Match button.
-
-
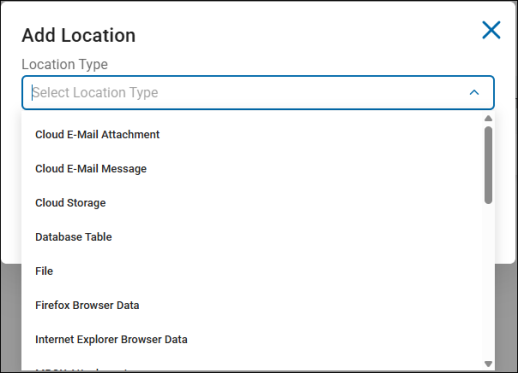
Add Location
-
To add a location by location type, click the Add Location button.
-
-
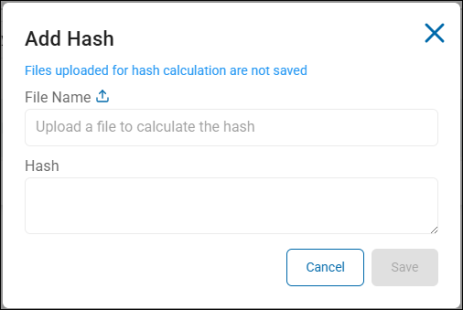
Add Hash
-
To add a Hash, click the Add Hash button.
-
-
Select from the following:
-
Match Data Type, such as personal address, telephone number, etc. to scan for (and set to ignore) from the drop-down menu
-
Options include: AnyFinds, Sensitive Data Definitions (SDD), and Search API identity types
-
-
Location Type
-
Options include: AnyFinds, Sensitive Data Definitions (SDD), and Search API identity types
-
-
Hash
-
Options include: Hash files of: AnyFinds, Sensitive Data Definitions (SDD), and Search API identity types
-
-
-
In the Match or Location field enter the specific data for Spirion Sensitive Data Platform Agents to scan for and match. If adding a Hash, upload a file to calculate the Hash. Note: Files uploaded for hash calculation are not saved.
-
The text entered in this field must be perfectly accurate.
-
IMPORTANT! This field is free text. This field does not validate its contents as a Match corresponding to the selected Data Type. It does not detect if the Pattern checkbox is checked.
-
The length of the match is unlimited. For example, this matches what services and the database allow.
-
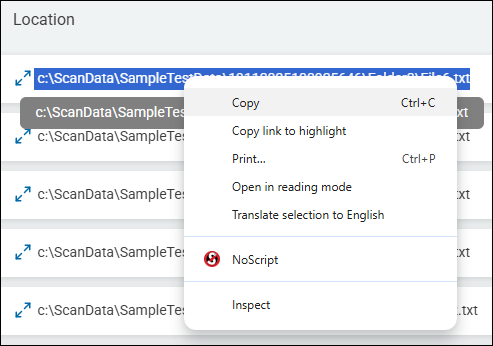
Tip! We recommend you copy the location you wish to add to this field from the Scan Results page. Select Scans from the left-side navigation on the homepage, select Scan Results. Click the button Find Scan Results. The Scan Results page opens with scan results. Find the Location entry you want from under the "Location" column in the table. Triple-click the entry to select it. Copy the selection. Optionally, paste the location into a notepad document as a short-term safeguard. Navigate to the Global Ignore Lists section, select the LOCATIONS tab, select the appropriate Location list, click the Add Location button, select the Location Type, and paste the copied Location into the "Location" field.
-
Note: Different Global Ignore Lists can have the same matches.
-
-
Matches only
-
The Pattern checkbox enables you to use a Regular Expression to match search results rather than matching a specific value. See When and How to Use Pattern Matching above.
-
If the data you entered in the Match field represents a pattern for Spirion agents to scan for, check the Pattern box.
-
-
Click Save.
-
When scans are performed, Spirion Sensitive Data Platform Agents scan for and match the sensitive data, sensitive data pattern, location, and/or hash specified and ignore the data.
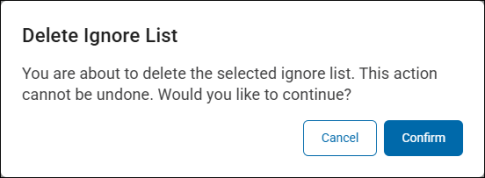
How to Delete a Global Ignore List
The procedure to delete a Global Ignore List is the same for Matches, Locations, and Hashes.
To delete a Global Ignore List, use the following procedure:
-
Navigate to the Scans Settings page.
-
Expand the section Global Ignore Lists.
-
Find the Global Ignore List you wish to delete.
-
Next to the list, select Actions, and then select Delete List.
-
Click Confirm to delete the list.
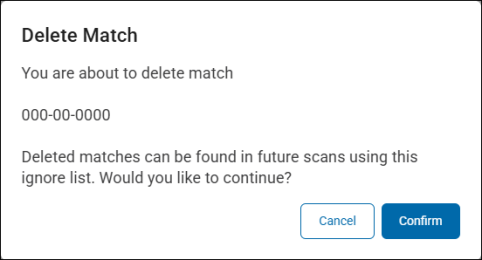
How to Delete a Sensitive Data Match from a Global Ignore List
To delete a Global Ignore List, use the following procedure:
-
Navigate to the "Scans Settings" page.
-
Expand the section Global Ignore Lists.
-
Find the match you wish to delete under the Match column.
-
Next to the Match select the more options menu with 3 vertical dots and select Delete.
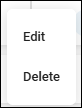
-
Click the Confirm button at the bottom of the dialog to delete the match from the list. The "Delete Match" pop-up dialog specifies that by deleting this sensitive data match, it can be discovered and recorded in futures scans.
User Role Permissions Required to access Global Ignore Lists
The Global Ignore Lists section appears on the Scans Settings page for Admin users only.
-
Users who are not members of the Admin user role do not see the Global Ignore Lists section and cannot access it or use it.
-
To add users to the Admin user role see How to Manage User Roles>USER ROLES tab.
-
The Global Ignore Lists section does not show the matches content (or data) for other user roles
-
The API for loading ignored matches data is also restricted to Admin users.