
User Guide
Working with Scans
Overview
-
Scans are the searches that agents perform on Targets to find either the file locations or find specific data types within the Files and Folders.
-
The Scans screen is where you view, create, and manage your scans.
Note: During the process of creating a new scan you must select a playbook. If you have not created a playbook, you must create one. You cannot perform a scan of your Targets without a playbook.
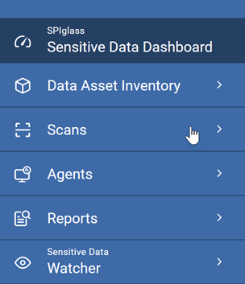
Access and View Scans
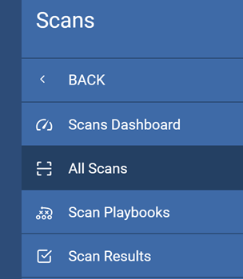
To access Scans:
-
From the left menu, click Scans.
-
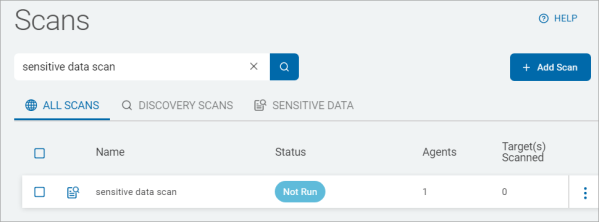
Click All Scans.
-
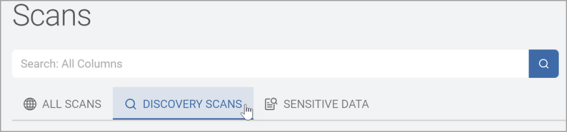
You can view by All Scans, Discovery Scans, or Sensitive Data Scans. Click a tab to change the view.
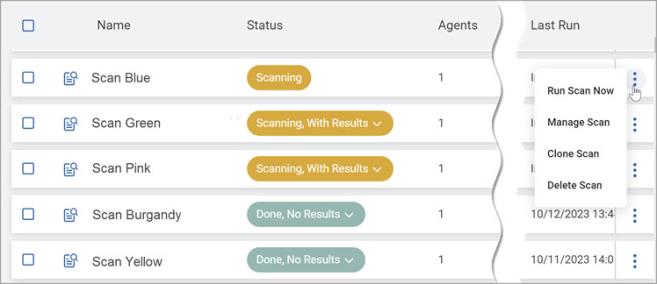
Scans are displayed by column:
-
Name
-
Status
-
Agents
-
Targets(s) Scanned
-
Next Run
-
Last Run
-
Scan Owner
-
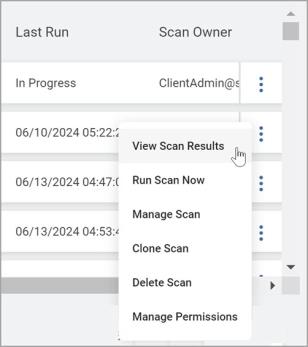
More options (Note: options can vary depending on the scan status.)
-
View Scan Results
-
Run Scan Now
-
Manage Scan
-
Clone Scan
-
Delete Scan
-
Search for a Scan
To search for a specific Scan:
-
Type a column name in the search box.
For example, search for a scan name.
-
The search results are displayed in the scans table below.
Create a New Scan
Select the type of scan and complete the Scan Configuration wizard using these guides:
Note: When you create a scan and select options for excluding files or settings for maximum file sizes, all Target types except Dropbox use your selected configurations to improve scan times.
View Scan Results
-
The default view of results from a specific scan condensed by location.
-
As a result, the default itemization of the Scan Results table is locations with matches, which includes summary information of the location’s data type(s), match count, and playbook action(s).
-
-
Each location can be expanded to view its matches.
-
This launches a modal containing details for individual matches, including the match string itself, and options for user level remediation (ULR).
-
-
Options for ULR actions emphasize the difference between location-level and match-level actions, as explained in the following section.
-
The traditional match view is still available and can be toggled to by clicking on Total Match Count next to the Actions button.
-
The option to View Scan Results by Location is nested under the Actions button.
To view scan results:
-
From the All Scans page, locate the Scan you want to view.
-
From the kebab menu, select View Scan Results.
-
Alternatively, you can filter to a subset of matches from the Scan Results page.
-
-
Itemization by location is confirmed by the following:
-
Total Match Count listed at the top-right of the screen, next to the Actions button.
-
Clicking this toggles to results itemized by match.
-
-
The Location column has an expansion icon:
-
Clicking this icon opens the ULR modal including match data.
Note: For database Targets, the column name is in the match info tool tip, accessed by clicking the i next to a match.
-
-
The URL of a location-based results table ends in “/scans/results”
-
The URL of a match-based results table ends in “/scans/results-alt”
-
As noted above, clicking the Total Match Count button lists results itemized by match.
-
-
There is also a View Scan Results by Match option accessible from the Actions button.
-
Returning to Results by Location
-
From the Actions button, select View Scan Results by Location.
-
Spirion Agent 13 and Later
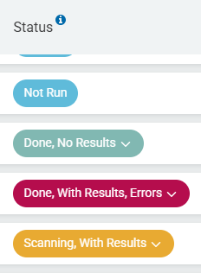
If Spirion Agent 13 or later is installed, the Status column displays the status of the scan and the available options in a drop-down list:
-
Scanning
-
View Details
-
-
Scanning, With Results
-
View Details
-
View Scan Results
-
-
Done, With Results
-
View Details
-
View Scan Results
-
-
Done, With Results, Errors
-
View Details
-
View Scan Results
-
-
Done, No Results
-
View Details
-
-
Not Run
View Details
To view the details of a scan:
-
From the Status column, click the drop-down list of the scan you want to view.
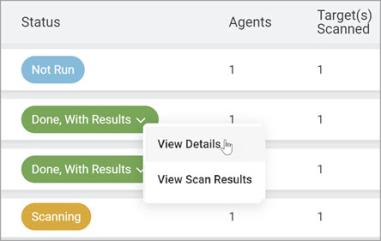
-
Click View Details.
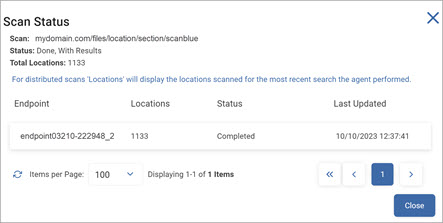
The Scan Status pop-up window displays:
-
Scan Name
-
Status
-
Total Locations
-
Endpoint
-
Locations
-
Status
-
Last Updated
View Results
To view the results of a scan:
-
From the Status column, click the drop-down list of the Scan Results you want to view.
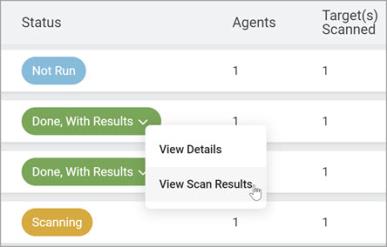
-
Click View Scan Results.
-
The Scan Results screen is displayed.

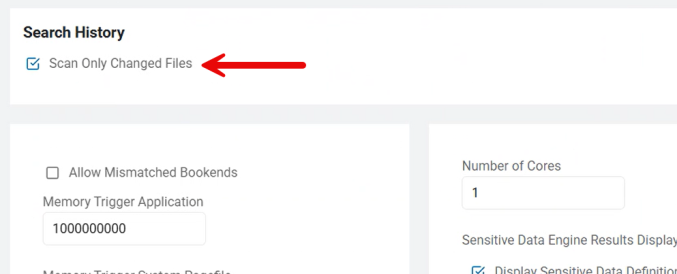
Differential Scanning
-
When creating a new scan, approximately the 11th step in the wizard is a Select advanced options page under Search History with the option Scan Only Changed Files
-
This is the Differential Scanning setting. See the image below.
New in version 13.4 is a feature called Differential Scanning.
Differential scanning:
- Is enabled by default for new scans using v13.4 or later agents
- Scans only files that have changed since the last scan
- Scans all the files in your Target when the initial scan is performed
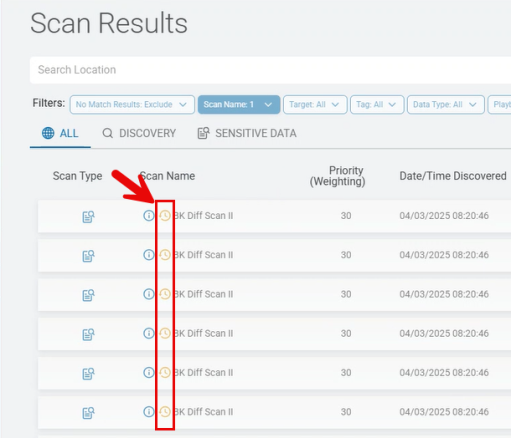
- When scans are complete, skipped (unscanned) files are marked with an icon on the Scan Results screen. See the image "Scan Results with Skipped Locations" below.
- Open the skipped location from the Scan Results page for additional details
- Is located on the screen Select advanced options under Search History. See the image below.
Email Drafts and Attachments
-
With Differential Scanning enabled (it is enabled by default), when scanning either Exchange or Gmail locations, emails in draft form as well as attachments to such emails are always scanned, regardless of their state of change. The emails and attachments are never marked to be skipped.
Impact of Classification
-
Important! Given that Differential Scanning is enabled (it is enabled by default), locations/files which are classified by SDP during a scan are not marked for rescanning as the location/file has not been altered, and can therefore be skipped during the next scan, assuming no other changes are made.
Impact of Redaction
-
Important! Given that Differential Scanning is enabled (it is enabled by default), and sensitive information in locations/files are redacted by SDP, then the locations/files are still marked for rescanning regardless of any other changes being made. Marking redacted files to be skipped by subsequent scans would result in playbook rules being unenforced.
Impact of AnyFind Definition Change
-
Important! If your Agent is updated and this includes a change to AnyFind logic (the AnyFind definition file changes) all existing Search History is invalidated.
Scan Results with Skipped Locations
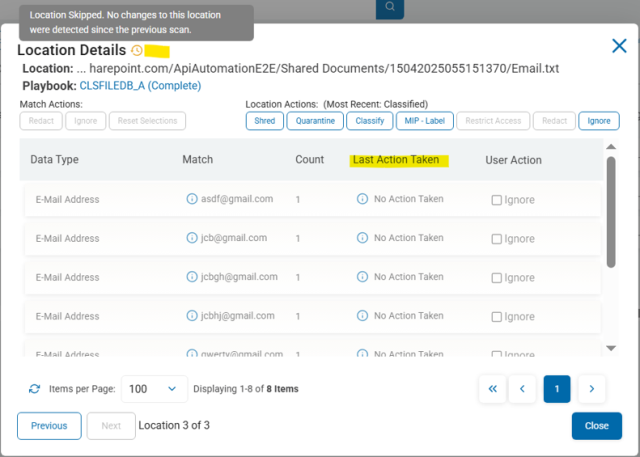
Skipped Location Details
-
Note the Location Details in the screenshot below and the details under the column Last Action Taken
Supported Sources
-
Amazon S3
-
Box
-
Dropbox
-
Exchange
-
Exchange Online
-
Gmail
-
Google Drive
-
OneDrive
-
Local files and folders
-
Remote files and folders
-
SharePoint
-
SharePoint Online
Unsupported Sources
-
Any Database
-
BitBucket
-
OLEDB
-
ODBC
-
Website
User Level Remediation (ULR)
When viewing results by location, the location string has a diagonal-arrow icon next to it that launches the modal containing User Level Remediation controls.
-
Depending on the location and file type, unsupported actions will be grayed out and cannot be selected.
There are two levels of remediation to consider:
-
Location: Actions are applied to the entire location (shred, quarantine, classify, restrict access, redact, ignore).
-
Match: Actions are applied to specific matches (redact, ignore, etc.).
There are also two types of actions to consider:
-
Instant: Actions are resolved immediately (database-only classification, ignore).
-
Agent Resolved: Actions are pushed to the agent to be completed (everything else).
It's important to note the following:
-
Actions triggered by ULR controls show up in the audit log once completed, with an action history also available directly in the Scan Results table that is viewed by clicking the i icon in the corresponding column.
-
ULR also introduces a centrally managed ignore list for agent-specific or global exclusions based on location or match result.
-
The remaining ULR actions adhere to the values set globally in the console (quarantine/redact) or locally in an agent policy (shred).
Playbook Overrides
The ULR actions described in the subsequent sections two types of playbooks:
-
Incomplete (manual action) playbook decisions:
-
Scan results indicating User Action/Intervention Required will resolve with a status of Overridden.
-
-
Complete (automatic action) playbook decisions:
-
Scan results indicating Complete will resolve with a status of Complete, Overridden.
-
Location Actions
Procedure:
-
Viewing results by location, select the diagonal-arrow icon next to any location path.
-
Select any of the relevant Location Actions at the top of the resulting modal:
-
Shred, Quarantine, & Redact: Displays a confirmation prompt indicating action cannot be undone.
-
Classify & MIP Label: Displays pull-down menus with available classifications.
-
Restrict Access: Displays a prompt for which built-in accounts should retain access.
-
Ignore: Displays option to ignore the location for the agent that completed the scan (discovering Agent) or globally (all Agents).
Note: Redacting at the location level redacts all applicable matches found in the file; controls to redact individual matches are explained in the following section.
-
-
Once applied in the console, the action is queued for execution.
Note: Agent resolved actions require the agent to be online to complete; instant actions are resolved immediately.
See the description above for details.
-
When successful, actions move from Queued (received) to Processing (attempted) to Most Recent: <Action>.
-
If the action fails, it will be noted in the EPS logs.
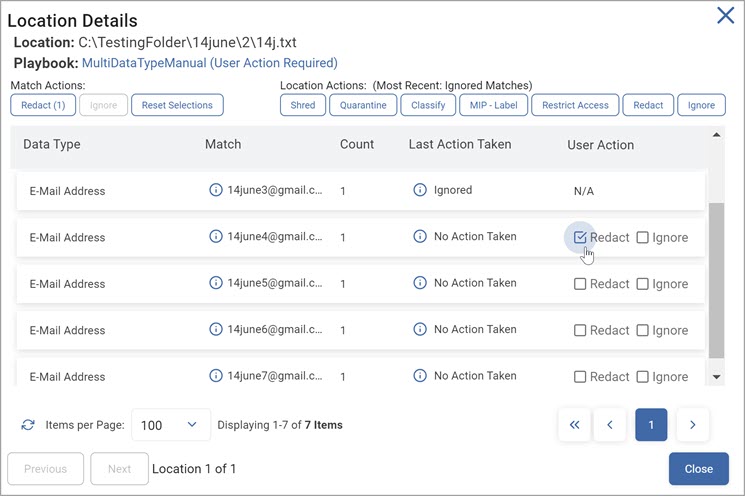
Match Actions
Procedure:
-
Viewing results by location, select the diagonal-arrow icon next to any location path.
-
Select the desired remediation outcome from the User Action column, which populates with choices (redact and/or ignore) dynamically based on the target location and file type.
-
Counts for each selected action populates under Match Actions.
-
The action(s) trigger upon clicking the button corresponding to the intended outcome:
-
Ignore: Displays option to ignore the selected match(es) for the agent that completed the scan (discovering Agent) or globally (all Agent”).
-
Redact: Displays confirmation to redact the selected match(es).
-
Once confirmed, the action(s) queue for execution:
-
When successful, actions move from Queued (received) to Processing (attempted) to Most Recent: <Action>.
-
Failed actions are reported in the Action History of Location Details for any given mach.
-
It will also be noted in the EPS logs.
Note: Redaction requires the agent to be online to successfully complete; ignore actions are resolved immediately.
See the description for details. -
Ignore List
To access the Ignore List:
-
From the Scan Results page, select View Ignored Locations (or Matches) from the Actions button.
-
Globally ignored matches have an N/A in the Agent column.
-
Matches can be unignored as needed.

-