
User Guide
How to Use Installations
Before you Begin
-
Satisfy all Installation Prerequisites
-
Port Communications
-
The following ports must be open to allow for communication between Agents when using the Discovery Team feature:
-
5433
-
6433
-
443
-
-
-
Build the Package
-
Right-click and run as Administrator (even if already logged in as Admin).
-
-
Upgrade Steps
-
NEVER upgrade endpoints before your console upgrade date.
-
ALWAYS build a new MSI for each upgrade attempt.
-
-
Required Testing
-
Manually install the MSI on a single endpoint to verify functionality before mass deploying to all your endpoints
-
-
MSI Building Tips
-
Use the latest MSI builder.
-
NEVER use the .exe installer: it results in endpoints failing to poll in the console
-
Obtain a new clientsettings.reg file if your console location has changed
-
-
Deployment
-
Stagger upgrades by department or groups to minimize disruptions.
-
Reboot endpoints after installation/upgrade for smooth operation.
-
-
Troubleshooting
-
Confirm endpoints are "heart beating"
-
If endpoints don’t poll in, contact support@spirion.com
-
Overview
Installation is performed via installation wizard.
Within the Spirion Sensitive Data Platform UI, the Registration page contains information required to install new versions of Spirion Sensitive Data Platform.
To access this screen use the following steps:
-
From the left side navigation menu select Agents.
-
Next, select Registration.
-
The "Registration" page opens.
-
Use the information in the page title tool tip as well as the instructions below to install your new version of Spirion Console and Agents.
How to Install Spirion Agents v13.6+
Note: For Windows 11, both Spirion Sensitive Data Platform and Sensitive Data Manager console scans accept only HTTPS.
Installation Prerequisites
Prior to Agent installation, the following requirements must be met:
Microsoft Visual C++
Note: See Microsoft Visual C++ Redistributable Downloads for supported versions.
Installation of the following Microsoft Visual C++ files:
-
VC_redist.x86.exe -
VC_redist.x64.exe
Note: When using TLS 1.3 only on Windows 11 Agents, MIP labels and Protection do not work unless the Windows machine uses the 14.44 (2015-2022) redistributable versions.
- https://aka.ms/vs/17/release/vc_redist.x86.exe
- https://aka.ms/vs/17/release/vc_redist.x64.exe
.NET Framework
.NET Framework is NOT necessary in all installation scenarios.
-
Core Agent Functionality: The Spirion core Agent and Windows Shell Extension operate independently and do not require the .NET Framework.
-
SharePoint Dependency: To scan SharePoint as a source of sensitive data, this functionality requires the .NET Framework at runtime.
When you build your custom MSI, you choose an OCR Image Search Module option.
-
Only the setting "OCR 2013 (Recommended .NET 4.0 required on client)," requires the .NET Framework. All other configurations, including the default, do not.
 to install")
Note: See Microsoft .NET Documentation and .NET Framework Installer for Windows for more information.
How to Check your .NET Version
-
Go to Control Panel > Programs > Programs and Features.
-
Locate "Microsoft .NET Framework"
-
Ensure the application version is 4.8.0 (528049) or higher
How to Prepare an MSI Installation Package
Use the following topics to create a Spirion Sensitive Data Platform (SDP) Agent installation package (.msi) and use it to install Spirion Sensitive Data Platform Agents.
Note: The following instructions require you download files from the Spirion Customer Support portal.
To accelerate the installation process we recommend you login to the Spirion Customer Support Portal before continuing.
Gather Information
Use the following steps to gather the necessary information and files to create your personalized MSI installation package:
-
Create a new folder to store the files where you can easily find them, such as on your desktop.
-
Download the Spirion MSI Builder ZIP file from the Spirion Customer Support portal.
-
SpirionMSIBuilder13_0.zip - Used for versions 13.0 and earlier
-
MSI Builder 13.3.zip - Used for version 13.3-13.5
-
SpirionMSIBuilder136_signed.zip - Use for version 13.6. Spirion Sensitive Data Platform Agents version 13.6+ use a separate MSI Builder as PostgreSQL and pgBouncer replace RabbitMQ and Erlang in this version.
-
-
Extract the .zip file to the folder you created in Step 1.
-
From your Spirion Software and License site, download the latest version of Spirion Sensitive Data Platform client (such as "Endpoint for Windows") and place that in the new folder created in step 1 as well.

-
Place a copy of your license file in the folder. (You can obtain a copy of your license file from your Customer Portal.)
-
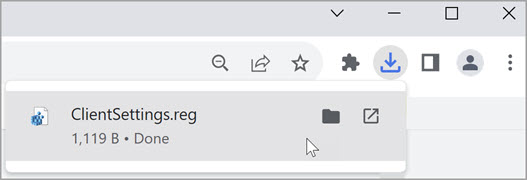
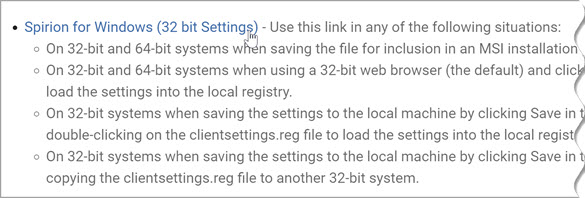
Download your Registry file (clientsettings.reg) from the Spirion Sensitive Data Platform Registration page:
-
Log in to the provided web address of your Spirion Sensitive Data Platform environment. Contact your Customer
Success Manager if you have any questions.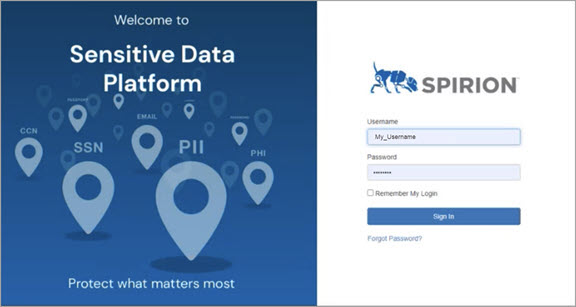
-
Download the 32-bit version to your computer.
-
Place a copy of the
clientsettings.regfile in the folder you created in Step 1.Note: Always use the 32-bit version of the .reg file even if you use a 64-bit system.
When the MSI runs, it determines the bitness of the machine and will put the registry in the appropriate place.
-
How to Create the MSI Installation Package
To prepare your custom MSI installation file you perform the following 8 general steps:
-
Set your Installer and Output files
-
Set your license file (obtained using the topics above)
-
Set your registration file (obtained using the topics above)
-
Configure services (only if necessary, only after consulting archTIS Spirion)
-
Set your PostgreSQL options
-
Set your Firewall options
-
Set your OCR Image Search Module (default option provided)
-
Set any additional, advanced settings (optional)
Use the following steps to create the MSI installation package::
-
Run
SpirionMSIBuilder.exe.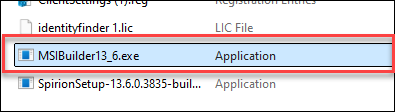
-
The "Spirion Endpoint Custom MSI Builder" application opens.
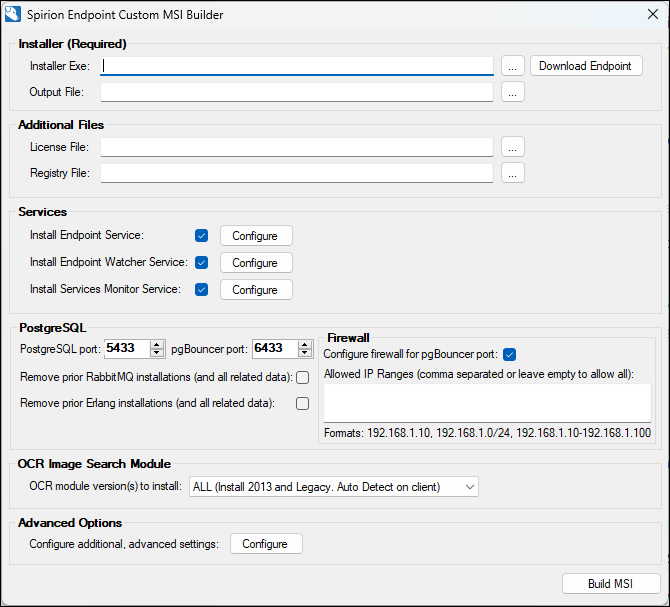
-
Installer section:
-
Installer Exe (Required): Input the full path to the Agent executable (.exe) file you put in your new folder or click the "..." button and navigate to the endpoint installer .exe file.
-
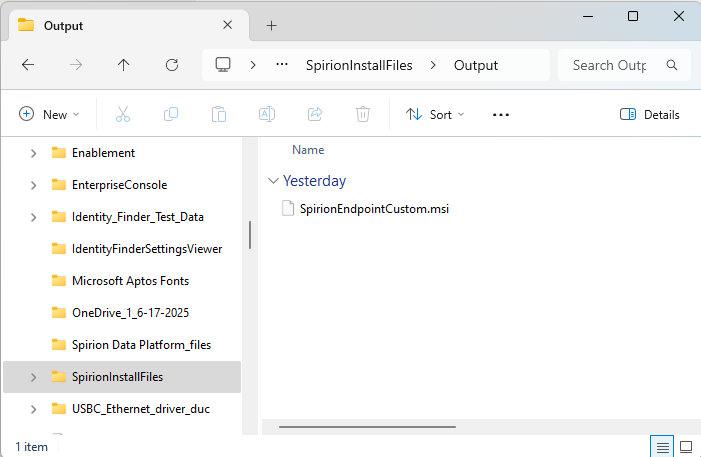
Output File (Required): Input the name and path of the resulting customized MSI. For example, C:\InstallationFiles\Output. The path will be created if it does not exist
-
-
Additional Files section:
-
License File: Input the full path to the identityfinder.lic file you put in your new folder.
-
Registry File: Input the full path to the ClientSettings.reg 32-bit registry settings file obtained from the console you put in your new folder.
-
-
Services section: Click Configure next to the service your want to edit:
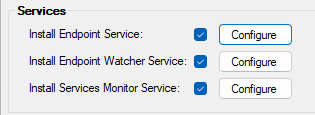
-
Install Endpoint Service: Specify whether the Identity Finder Endpoint Service should be installed.
(When using the client with the enterprise console, this box must be checked or communication with the console will fail.)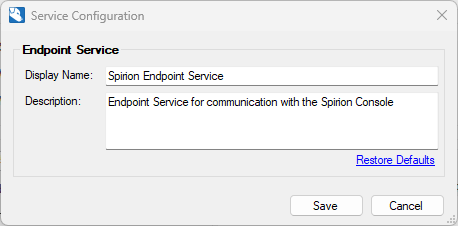
-
Display Name: Specify the name of the service that appears as the "Display name" in the Services Control Manager.
This display name is shown in the "Name" column.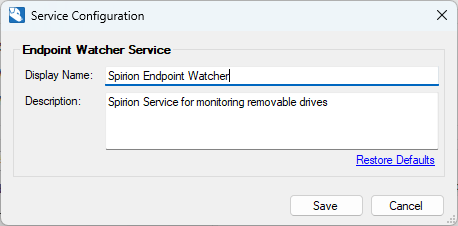
-
Description: Specify the description of the service that appears as the "Description" in the Services Control Manager.
This description is shown in the "Description" column.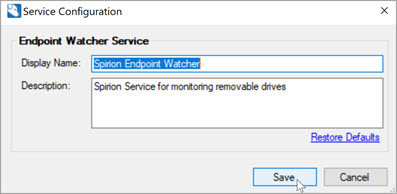
-
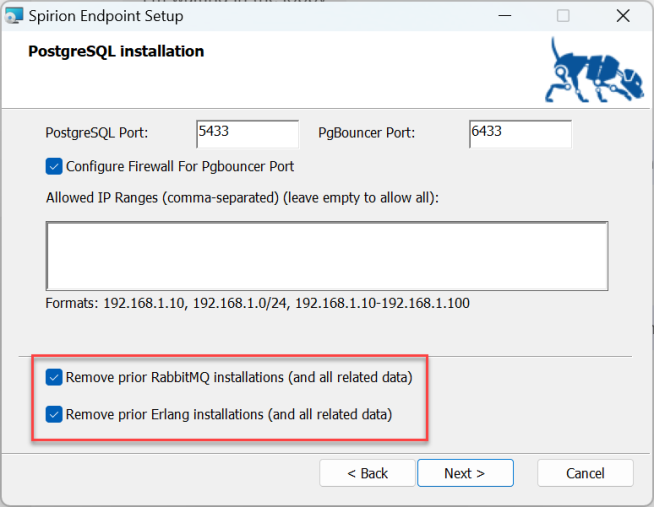
PostgreSQL: Version 13.6 introduces PostgreSQL as a replacement to RabbitMQ (RMQ). PostgreSQL is a message queuing system used to enable advanced features in Spirion Sensitive Data Platform.
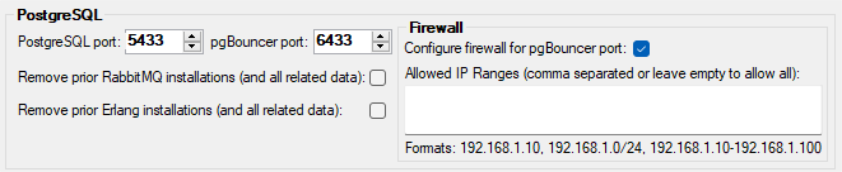
Note: The ports specified here must be open to allow secure communication between Spirion’s Agents across the client network.
- Our distributed architecture requires machines to exchange data through PostgreSQL's connection pooler - pgBouncer - which listens on the configured port (default: 6433)
- The installer can open these ports to a limited set of IP addresses via Windows Firewall. This setting does not impact other firewalls or network-level policiesNote: By default, Spirion configures both inbound and outbound rules to ensure bi-directional communication. This enables machines to both receive connections from other Agents and initiate connections to them as needed. Since any Agent machine can be used to hold the locations discovered, both capabilities are required.
-
PostgreSQL port: Enter the port for PostgreSQL to use. Default: 5433
-
pgBouncer port: Enter the port for the pgBouncer application to use. Default: 6433
-
Remove prior RabbitMQ installations (and all related data) - Disabled by default. New for version 13.6. Removes the RabbitMQ application and all related data.
-
Remove prior Erlang installations (and all related data) - Disabled by default. New for version 13.6. Removes the Erlang application and all related data.
-
Configure firewall for pgBouncer port - Check this checkbox to configure the Microsoft Windows native firewall to allow traffic through the specified pgBouncer port. Note: This does NOT apply to any other firewalls running on your machine or on your network.
-
Allowed IP Ranges - Specify allowed traffic by IP range by entering the IP ranges in this field.
-
IP addresses specified here become whitelisted addresses. Only traffic from these specific IPs are allowed through the firewall.
-
When left empty, the firewall rules are created with "Any" (*) as the remote address, meaning the port accepts connections from all IP addresses on your network. Spirion does not recommend this setting; we want to ensure that only the machines in the client network are allowed to send and receive traffic.
-
Valid IP formats are shown under the field and include the following (example values shown):
-
Single IP address: 192.168.1.10
-
Dotted-Decimal (Start-End): 192.168.1.10-192.168.1.100
-
CIDR (Classless Inter-Domain Routing): 192.168.1.0/24 (where /24 indicates the first 24 bits define the network).
-
-
-
OCR Image Search Module
-
This option installs one or both OCR modules or exclude the OCR module files from the target MSI if the module is not needed.
-
Choose an option from the drop-down list:
-
ALL (Install 2013 and Legacy. Auto Detect on the client): Include both OCR 2013 and OCR Legacy modules in the target MSI.
-
When selected, both modules will be installed on the client and the application will determine the appropriate module to load at run time.
-
If a single MSI will be deployed to machines with .NET Framework v4.8 or later (required for OCR 2013) and machines with .NET Framework v4.8 or greater, select this option.
-
This option creates the largest target MSI.
-
-
OCR 2013 (Recommended: .NET Framework 4.8 required on the client):
-
Include only the OCR 2013 module in the target MSI.
-
When selected, the Legacy OCR module will not be included and only clients with .NET Framework v4.8 or later will be able to perform an OCR search.
-
-
OCR LEGACY (.NET not required on the client):
-
Include only the Legacy OCR module in the target MSI.
-
-
NONE (If not licensed to OCR, select to reduce file size):
-
Do not include an OCR module in the target MSI.
-
If OCR is not licensed, this option should be selected to create the smallest target MSI.
-
Note: For the OCR module to be used, the license must include OCR. If the OCR module is not licensed, clearing this option will make the installation package significantly smaller.
-
-
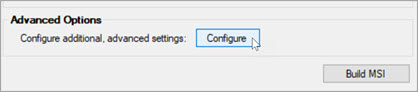
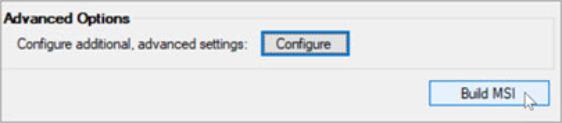
Advanced Options
Use this option to configure additional advanced settings:
-
To configure additional, advanced settings to control the installation experience, click the Configure button.
-
When the "Configure Advanced Options" dialog is displayed, the default value for each property is displayed.
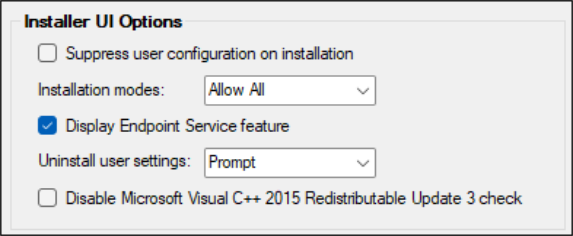
Installer UI Options
-
Suppress user configuration on installation:
-
Installs the application without allowing the end user to customize any settings.
-
A simple progress bar with a cancel button will be displayed.
-
-
Installation modes: Select an option from the drop-down list:
-
Allow All (default) enables the user to select the "Typical" or "Custom" setup type.
-
Disable Custom - Force the user to select "Typical." If a user can access the Custom Setup, they are able to turn on and off the installation of shortcuts, the endpoint service, and other features.
-
Disable Typical - Force the user to select "Custom." If a user can access the Custom Setup, they are able to turn on and off the installation of shortcuts, the endpoint service, and other features.
-
-
Uninstall user settings:
-
Prompt: Show the prompt "Would you like to remove your user settings?" to the user on uninstall.
-
Force Save: Force settings to be saved during uninstallation without a user prompt
-
Force Removal: Force settings to be removed during uninstallation without a user prompt.
-
-
Display Endpoint Service feature: Shows the Endpoint Service feature in the UI of the installer allowing a user to enable or disable the installation of the service.
-
This setting is available only when Install Endpoint Service is checked on the main dialog and the Suppress user configuration on installation setting is not selected (as it does not apply in those cases).
-
-
Disable Microsoft Visual C++ 2015 Redistributable Update 3 check:
-
Select to skip the check for Microsoft Visual C++ 2015 Redistributable Update 3.
-
Disable to prevent pop-up windows during a remote upgrade.
-
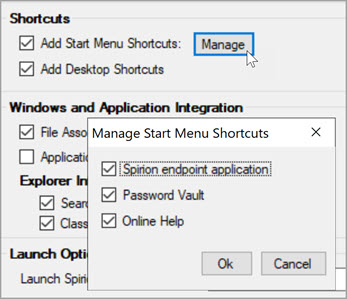
Shortcuts
-
Add Start Menu Shortcuts: Add a program group to the Start menu containing shortcuts to IdentityFinder.exe, the Password Vault, and/or the online help.
-
Checking this box will set the option to be enabled within the installer, but a user with access to the Custom Setup button will be able to disable the creation of shortcuts.
-
-
Spirion endpoint application: Shortcut to the main application
-
Password Vault: Shortcut to directly open the Password Vault (requires the user to enter their profile password)
-
Online Help: Shortcut to open the default browser to the client user guide at https://my.spirion.com/help/
-
Add Desktop Shortcuts: Add a shortcut to IdentityFinder.exe on the current user's desktop.
-
Checking this box will set the option to be enabled within the installer, but a user with access to the Custom Setup button will be able to disable the creation of shortcuts.
-
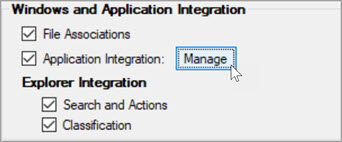
Windows and Application Integration
-
File Associations: Associate .idf and .idfvault extensions with the application allowing users to double click on saved results files and/or file vault files to launch Identity Finder and automatically load the specified file.
-
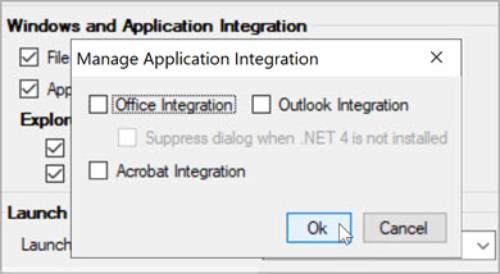
Application Integration: Install classification capabilities into Microsoft Office, Microsoft Outlook, and Adobe Acrobat.
-
Checking this box will set the options to be enabled within the installer, but a user with access to the Custom Setup button will be able to disable the installation of the add-ins.
-
-
Office Integration: Install an add-in to enable classification directly within Microsoft Word, Excel and PowerPoint versions 2010-2016 only.
-
Outlook Integration: Install an add-in to enable classification directly within Outlook version 2010 and later.
-
Acrobat Integration: Install an add-in to enable classification directly within Adobe Acrobat version 9 and later.
-
Suppress dialog when .NET 4 is not installed: The Outlook Add-In requires .NET Framework 4.8 and, by default, will prompt if it is not available. Select this option to disable the prompt.
-
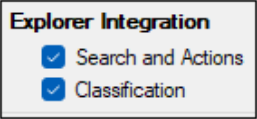
Explorer Integration: Add a right click menu for drives, files, and folders that provides direct access to search, secure, and shred capabilities without having to first launch the main application.
-
The options available via the right click menu can be customized via client application settings.
-
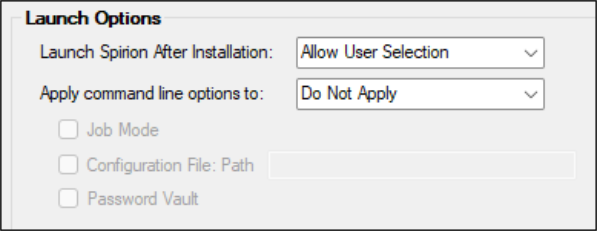
Launch Options
-
Launch Spirion After Installation:
-
Allow User Selection: The user has the option to open the client application after finishing the installation wizard or deselecting the checkbox to prevent it from launching.
-
Force Launch: Requires the user to launch the application upon finishing the installation wizard.
-
-
Apply command line options to: Command line options can be added to change the behavior of the application.
-
Do Not Apply: Default. Do not use command line options.
-
Initial Launch: Set via the final installer page
-
Shortcuts: Apply command-line options to desktop/start menu shortcuts
-
Initial Launch and Shortcuts: Apply command-line options to both the final installer page and desktop/start menu shortcuts
-
-
Job Mode: Start Spirion in Job Mode.
-
For more information, refer to Enterprise Client Command Line Switches.
-
-
Configuration File: Start Spirion with an XML configuration file path (for non-console users).
-
Provide the full path including drive letter or share name and file name to the location that will contain the configuration file.
-
This option does not install the configuration file.
-
For more information, refer to Enterprise Client Command Line Switches.
Note: This is only recommended for users without the console.
-
-
-
Password Vault: Launch the Password Vault.
-
For more information, refer to Enterprise Client Command Line Switches
-
-
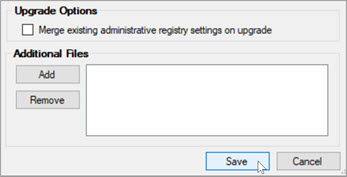
Upgrade Options:
-
Merge existing administrative registry settings on upgrade
-
Enabling this option will back up any settings in HKLM and restore them after the upgrade.
-
If a setting is specified in both HKLM as well as the .reg file of the MSI, the value in the .reg file of the MSI will be used.
-
-
-
Additional Files:
-
Install any additional file can be installed in the same location as IdentityFinder.exe.
-
The only file that has an impact on the application is activation.txt.
-
-
Click Build MSI. The MSI package will be saved in the folder location you created.
-
When the output build is complete the Finished! message is displayed next to the Build MSI button.

How to Deploy the MSI Package
Deployment:
-
archTIS recommends manually installing the MSI on one endpoint to verify functionality before mass deploying to the other endpoints in your environment.
-
Note about mass deployment of Agents: The v13.6 Agent installer has the MS Restart Manager which attempts to kill all "running" apps, including Windows desktop Explorer, so the command/parameter MSIRESTARTMANAGERCONTROL=Disable is VERY important to use when installing via command line or when using a mass deployment tool like Intune. See "How to Run the MSI Package (Silent Install)" below.
-
Stagger upgrades by department or groups to minimize disruptions.
-
Note: The upgrade application must be run with elevated Administrator privileges or RabbitMQ and Erlang will not correctly uninstall.
-
Reboot endpoints after installation/upgrade for smooth operation.
Troubleshooting:
-
Confirm endpoints are heart beating.
-
If endpoints don’t poll in, contact support@spirion.com.
How to Run the MSI Package (Interactive)
Note: The upgrade application must be run with elevated Administrator privileges or RabbitMQ and Erlang will not correctly uninstall.
Use the following steps to run the Spirion MSI package, interactively:
-
Locate the MSI package in the folder location you created and open it.
-
Open a command prompt or Windows PowerShell with Administrator privileges.
-
Navigate via the
cdcommand to the directory (such as c:\SpirionInstallFiles) which contains the custom Spirion Endpoint installation MSI. -
Enter the command
msiexec /i "YourCustomEndpoint.msi" MSIRESTARTMANAGERCONTROL=Disablewhere "YourCustomEndpoint.msi" is the name of your Spirion Endpoint installation MSI file such as "SpirionEndpointCustom.msi."-
An example command appears here:
CopySample Install commandc:\SpirionInstallFiles\Output>msiexec /i "SpirionEndpointCustom.msi" MSIRESTARTMANAGERCONTROL=Disable -
-
If the security warning pop-up window appears, click Run.
-
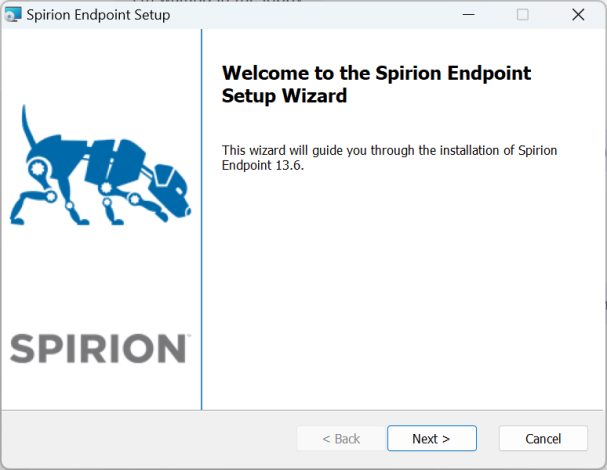
The "Spirion Endpoint Setup" wizard appears. Click the Next button.
-
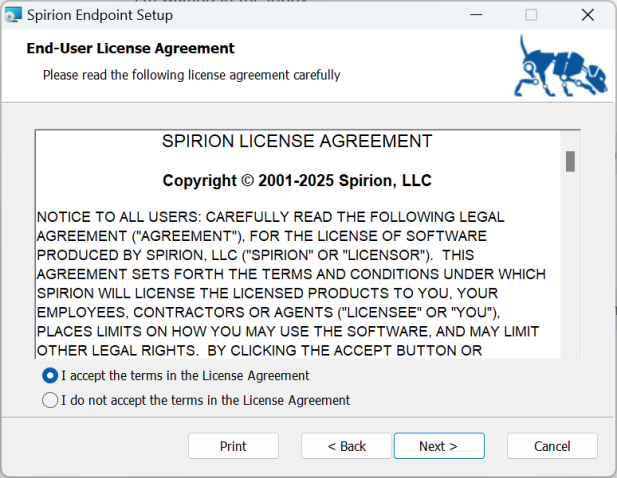
Ensure the "I accept the terms in the License Agreement" option is selected and click the Next button.
-
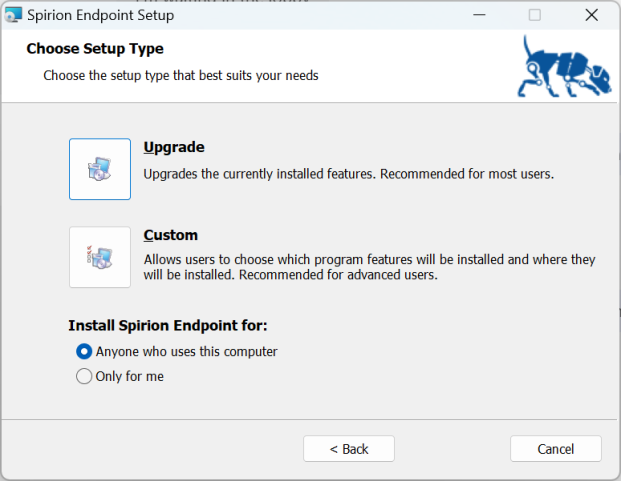
Ensure Typical (for new installations) or Upgrade (for existing installations) is selected.
-
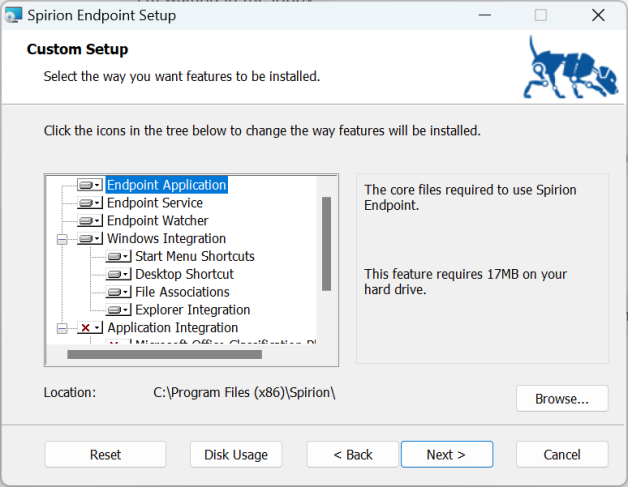
The next dialog allows you to select the features you want. Make the appropriate selections and click Next.
-
If necessary, click the Disk Usage button to ensure you have enough space on the drive you are installing to.
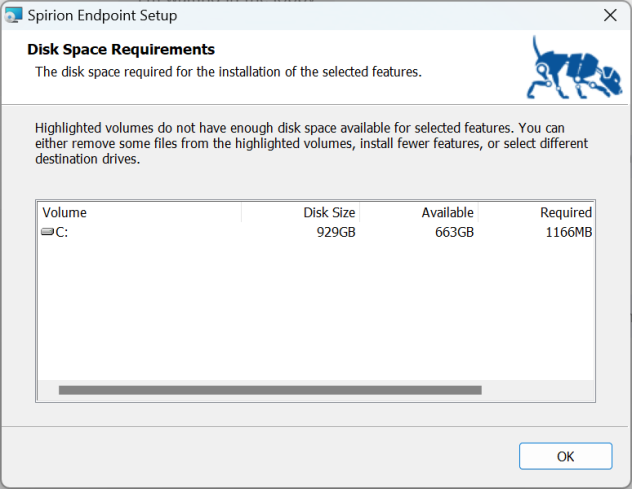
-
Click the OK button.
-
The PostgreSQL Installation dialog opens.
-
Spirion Endpoint version 13.6 requires PostgreSQL as it replaces RabbitMQ
-
RabbitMQ is not used by Spirion Endpoint version 13.6.
-
To remove RabbitMQ and/or Erlang, check the corresponding checkboxes at the bottom of the dialog
-
Click the Next button to continue
-
-
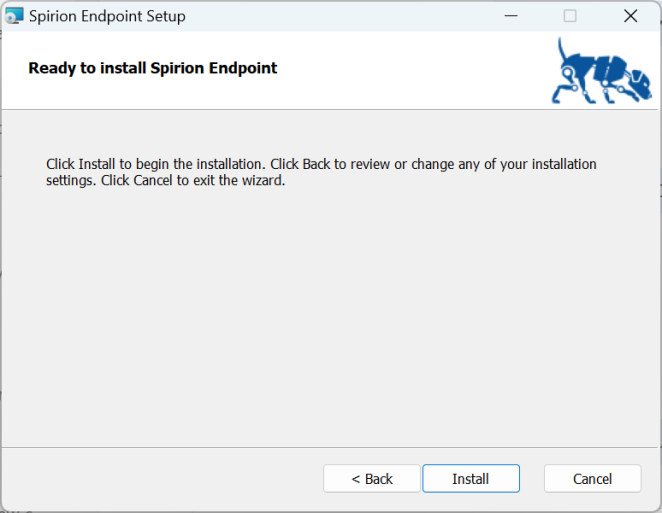
The Ready to Install Spirion Endpoint dialog opens.
-
Click the Install button.
-
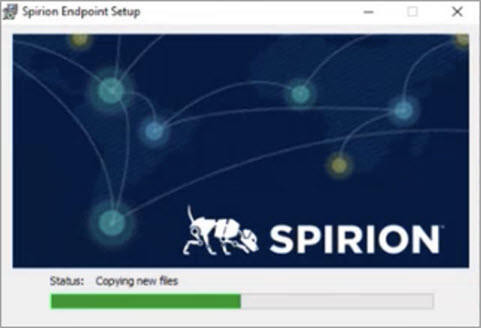
The Spirion Endpoint Setup Status pop-up window is displayed. It may take some time to finish the installation.
-
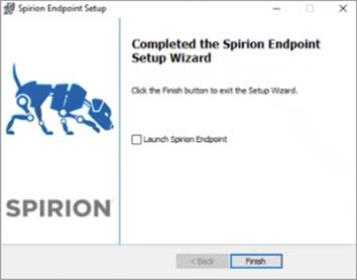
When the setup is completed, ensure the Launch Spirion Endpoint is deselected and click Finish.
-
Restart your computer.
Note: Please see How to Create a Custom MSI for more information.
-
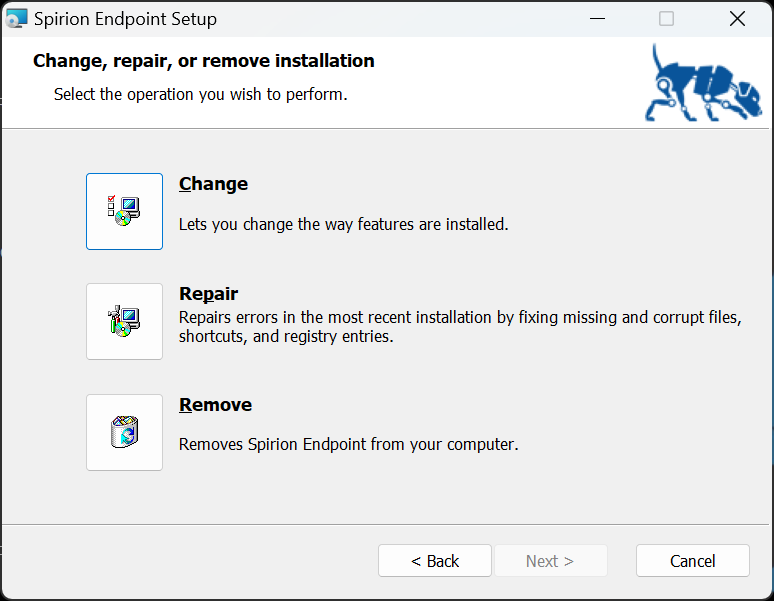
To change the way features are installed, repair errors in the installation by fixing missing or corrupt files, shortcuts, and registry entries, or to remove Spirion Endpoint version 13.6, re-launch the setup wizard and follow the appropriate prompts in the wizard.
How to Run the MSI Package (Silent Install)
Use the following steps to perform a silent installation of the Spirion MSI package:
-
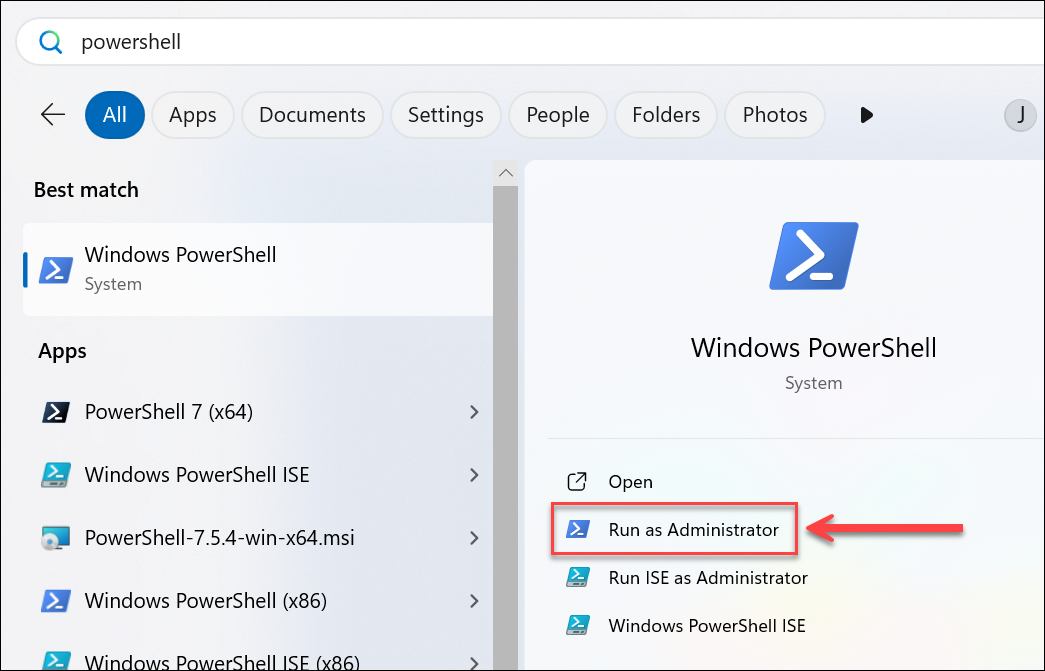
Launch a Windows PowerShell from the Windows Start menu.
-
Navigate via the
cdcommand to the directory (such as c:\SpirionInstallFiles) which contains the custom Spirion Endpoint installation MSI. -
To install in silent/unattended mode execute the following command in a Windows PowerShell with Administrator rights:
Silent Install
msiexec /i “Your_Custom_Spirion_MSI_name.msi” /l*vx “PathToOutput.log” /qn MSIRESTARTMANAGERCONTROL=Disable-
The installation process begins with no wizards or notices as it is a silent installation. Check the appropriate log files to verify the installation succeeded.
If Error is Thrown when Building the MSI
If you receive the error "Failed to extract MSI from Executable" when building the MSI, that is caused by one of the following reasons:
-
Using the incorrect MSI Builder for the version of the setup executable.
-
For example, if you are building a MSI for version 11 ensure that you are using the MSI Builder for version 11
-
The different versions of the MSI Builder are specified at the top of this article
-
-
Running the MSI Builder from within a folder that the current logged-in user on the machine does not have full permissions to, such as a folder on the root of the C:\ drive.
-
For example, you may need to run the MSI Builder from a folder in your user's Desktop folder to ensure that it is not the issue.
-
-
The issue can also be caused by running the .exe without first extracting it from the MSI file
How to Test MSI Installation Packages
Because changes to the MSI must be made exactly according to Microsoft's requirements, any invalid input file (for example, incorrect license file, invalid registry settings file) or typographical or formatting error could cause the installer to fail. Therefore, it is critical to test the complete package prior to deployment.
To test the MSI installer package, complete the following steps:
-
Launch the MSI by copying it to a test workstation and double-clicking on it.
-
Complete the installation wizard and allow the installation to finish. If the MSI fails to successfully complete the installation, reference the "Troubleshooting" section below.
-
Launch the Identity Finder client.
-
If a license file, identityfinder.lic, was included in the installer, the activation screen should not be displayed.
-
If the activation screen is displayed, then the license provided was either invalid or expired.
-
Contact whoever provided identityfinder.lic and have them consult with the sales team to determine the licensing issue.
-
-
Run a search on the test workstation and ensure that some results are found.
-
If the test workstation has no data on it, test data may be downloaded and placed on the system for testing purposes.
-
-
If communication with the enterprise console was part of the installer packager, wait 10 minutes after the search with results completes and the client has been closed.
-
Log in to the console and review the results from the test run.
-
If the results do not appear in the console, perform the appropriate troubleshooting steps to determine the issue.
-
How to Uninstall Spirion Built from an MSI
The Windows Installer, responsible for installing MSI packages, has a variety of installation and removal options.
Many desktop management and deployment systems integrate directly with the Windows Installer to provide options for removal of the client application, though it may be necessary or desirable to manually remove the client application from the command line.
The following command line uninstalls the client application and removes all user settings:
msiexec /x IdentityFinder-CompanyName.msi /qn MSIRESTARTMANAGERCONTROL=Disable FULLCLEANUP=1Where "IdentityFinder-CompanyName.msi" is the full path and name of the MSI.
The "/qn" at the end of the command line instructs the Windows Installer to set the User Interface level to "No UI".
-
For further command line options available from the Windows Installer, please review the official Microsoft documentation.
How to Troubleshoot MSI Installation Errors
There may be errors when attempting to install the MSI.
This section addresses common errors encountered as well as steps to perform if the MSI does not install properly.
What do I do if the MSI Installation Fails?
To address issues identified during an MSI installation, it is necessary to review the MSI errors.
To review the errors, instruct the Windows Installer to create a log file by launching the installer from a command line as follows:
-
Open a command prompt and navigate to the directory where the MSI is located.
-
In this example, the MSI is located in "C:\IdentityFinderMSI\IdentityFinder-CompanyName.msi"
-
At the command prompt enter the following command:
CopyIdentityFinder-CompanyName.msi /l*vx log.txt -
Where "IdentityFinder-CompanyName.msi" is the name of the custom MSI
-
Perform the installation steps until the error is displayed and then exit the installer.
-
Open the file, "log.txt" which was created in the same folder as the MSI and review its contents.
-
In most cases searching for the word, "error" yields the specific error that caused the installation to fail.
-
Perform an Internet search for the error by error number/code and error text.
-
The results usually yield information about the issue.
-
It may be necessary to consult with a qualified Windows system administrator or Windows Installer (MSI) expert to resolve the issue.
-
-
If the MSI was created only using MSI Builder and no other edits were made, open a support ticket to address the issues.
-
Be sure to include the log created in steps 1 and 2 above, a screenshot of the error dialog that is displayed during the MSI installation, and a link to a downloadable copy of the MSI (post the MSI somewhere on a publicly facing web site where the Identity Finder support team can access it for reference, if necessary).
-
If custom edits were made, they are not supported by our support team and must be addressed by the individual that edited the MSI.
-
Advanced Configuration Options
Silent Installation
The Windows Installer, responsible for installing MSI packages, has a variety of installation and removal options.
Many desktop management and deployment systems integrate directly with the Windows Installer to provide options for silent installation though it may be necessary or desirable to invoke silent installation or removal of an MSI manually from the command line.
The following command line launches an MSI installation without displaying any user interface:
msiexec /i IdentityFinder-CompanyName.msi /qnWhere "IdentityFinder-CompanyName.msi" is the full path and name of the MSI.
The "/qn" at the end of the command line instructs the Windows Installer to set the User Interface level to "No UI".
-
For further command line options available from the Windows Installer, please review the official Microsoft documentation.
How to Change the Default Installation Location
You may desire to install to a location other than the default Windows installation location.
The following command line, run as Administrator, or pushed via deployment tool, launches an MSI installation without displaying any user interface:
msiexec /i "IdentityFinder-CompanyName.msi" INSTALLFOLDER="C:\test\" /qn-
The above command works for fresh installations only
-
If you are upgrading, you must remove the client before re-installing using the script.
Digital Signature Requirements
If the Windows machines on which the edited MSI will be installed require installation packages to have a valid digital signature, you must re-sign the MSI, as the edits made using the MSIBuilder invalidate the digital signature from Identity Finder.
-
For more information on digitally signing the MSI, refer to the following article:
Command Line Interface Reference
All of the functions and settings available via the GUI are also available via a command line interface.
-
The main items are available via switches and the advanced options may be specified in an XML configuration file
-
Refer to the GUI section(s) above for descriptions of each setting
-
Refer to the file AdvancedOptionsConfiguration.xml in the MSIBuilder13_6.zip for a sample advanced configuration file
CopyIdentityFinderMSIBuilder.exe -Installer "C:\IdentityFinderMSI\IdentityFinderSetup.exe" -Output "C:\IdentityFinderMSI\IdentityFinderCompanyName.msi" [-License "C:\IdentityFinderMSI\IdentityFinder.lic"] [-RegSettings "C:\IdentityFinderMSI\ClientSettings.reg"] [-NoOCR] [-NoOCRNet] [-EPS|-NoEPS] [-Advanced "C:\IdentityFinderMSI\AdvancedOptionsConfiguration.xml"] [-Quiet]
Notes
-
All file paths must be enclosed within quotes
-
The -Installer and -Output switches are the only required switches (this is the same as when using the UI)
-
If a full path is not provided to the -Output switch, the MSI will be created in the same folder as IdentityFinderSetup.exe
-
The Endpoint Service is installed by default when using the MSIBuilder13_6, so the service is installed if neither -EPS nor -NoEPS is specified
-
The -Quiet switch prevents status messages from being displayed in a console window.
-
A log file, IdentityFinderMSIBuilder.log, is created in the folder where the file IdentityFinderMSIBuilder.exe is located
-
-
The -NoOCR switch prevents the legacy OCR files from being included in the MSI
-
The -NoOCRNet switch prevents the .NET OCR files from being included in the MSI
-
The configuration file supports one or more settings that are not part of the UI. These settings are documented with the sample XML configuration file.