
User Guide
Working with Policies
Overview
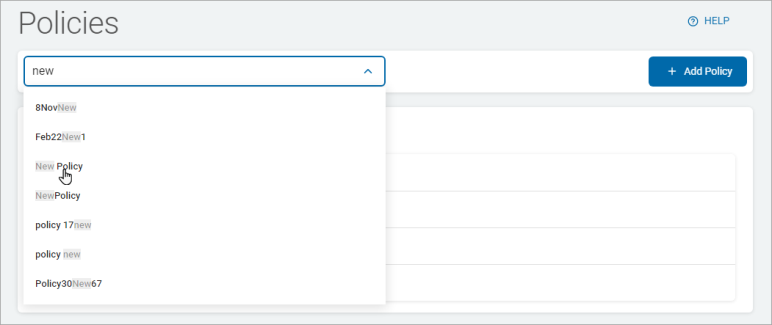
The Policies page is where you manage all your organization's policies.
-
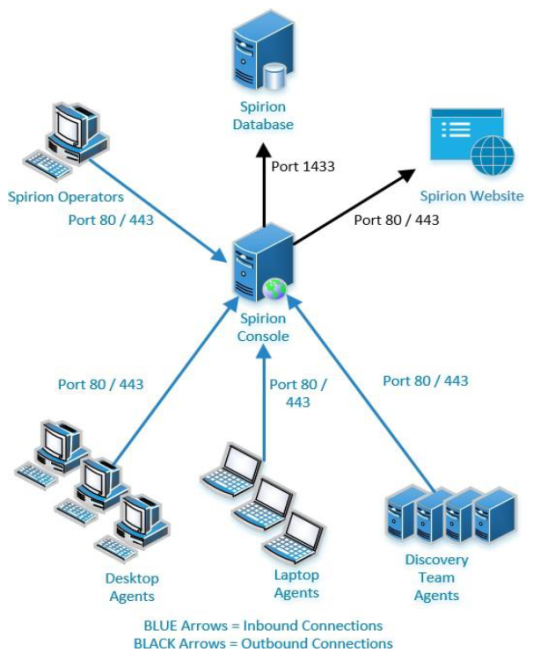
Policies govern how Agents, which are worker processes, scan and evaluate locations for sensitive data such as social security numbers and phone numbers.
-
This page contains detailed information about the settings that control how Agents operate.
-
This page also contains descriptions about
-
For more about Agents and how they work, see What is an Agent?
To access this screen:
-
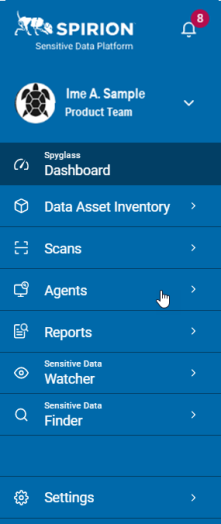
From the left menu, click Agents.
-
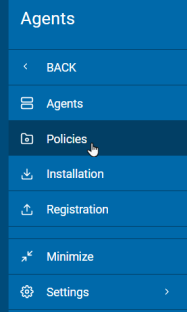
Click Policies.
View a Policy
Use the following steps to view an Agent policy:
-
Select an option from the Policy Configuration drop-down list.
-
The selected policy displays just below the Default Policy section.
-
Click the down arrow (
 ) to expand a section and up arrow (
 ) to collapse a section.
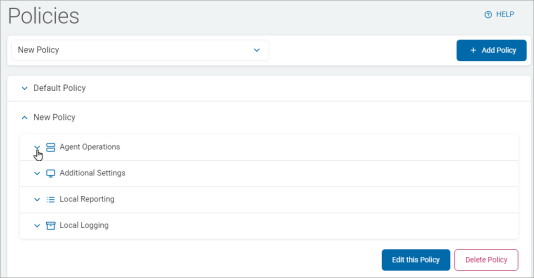
Each section displays a summary of the following:
- Agent Operations
- Additional Options
- Additional Settings
- Basic Options
- Advanced Options
- Local Reporting
- Local Logging
- Basic Options
- Advanced Options
Add a New Policy
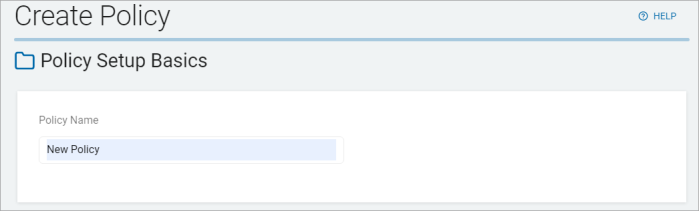
To add a new policy use the Add New Policy wizard:
-
In the top right of the screen, click Add Policy.

-
On the Policy Setup Basics screen, fill the Policy Name and click Next.
-
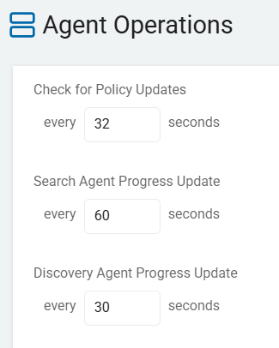
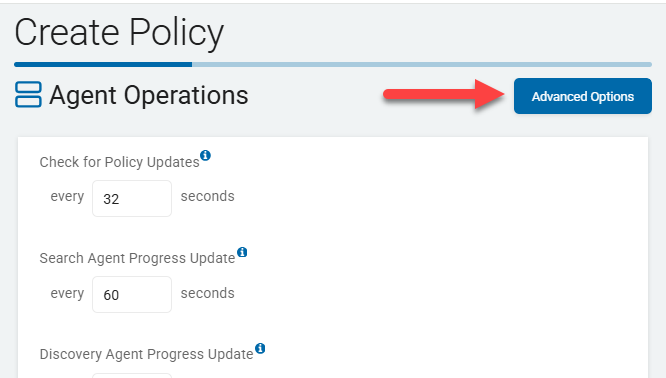
On the Agent Operations screen, set the time interval (in seconds) for the following:
-
Check for Policy Updates intervals (all versions)
-
Set the interval for the Agent to report policy updates to the console
-
Minimum value: 5 seconds
-
Maximum value: 86,400 seconds
-
-
-
Search Agent Progress Update intervals (version 13.5+)
-
Set the interval for the Agent to report progress updates to the console
-
Minimum value: 5 seconds
-
Maximum value: 86,400 seconds
-
-
-
Discovery Agent Progress Update intervals (version 13.5+)
-
Set the interval for the Discovery Agent to report progress updates to the console
-
Minimum value: 5 seconds
-
Maximum value: 86,400 seconds
-
-
-
-
Click Next to proceed, Previous to return to the previous screen, or Exit Without Saving
to discard. -
Click Advanced Options to input more detailed settings.
-
Expand the section for more information:
-
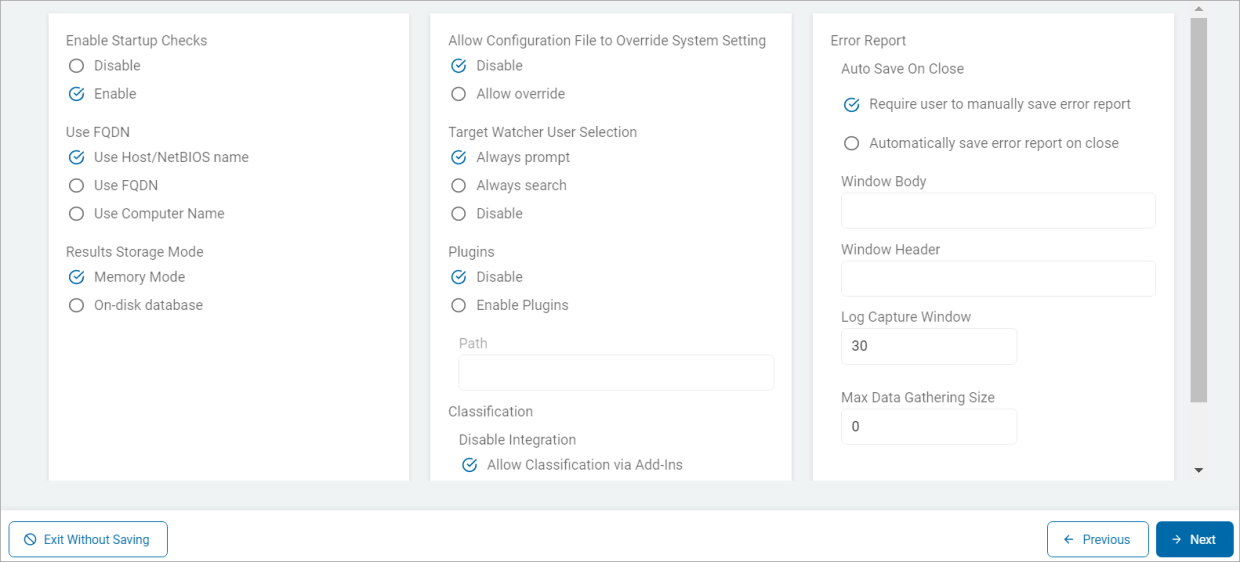
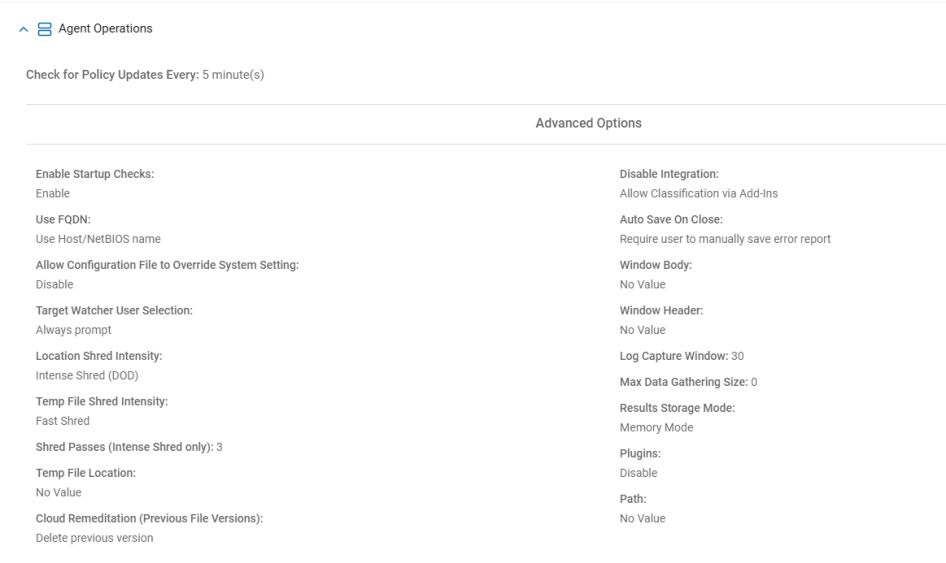
Agent Operations - Advanced Options
Use the table below to help you fill in the Agent Operations - Advanced Options page.
-
Select the blue Advanced Options button to access these settings.
| Setting Name | Options | Description |
|---|---|---|
|
Enable Startup Check |
|
Enable the console to verify the endpoint performs at startup.
|
|
Use FQDN |
|
The computer name format.
|
| Location Shred Intensity |
|
Controls how a file is deleted when a location is remediated using shred to prevent the deleted file from being recovered.
|
| Temp File Shred Intensity |
|
Controls how temporary files are deleted when removing temporary files created during a search.
|
| Shred Passes (Intense Shred only) |
|
The number of passes to use when Shredding files:
|
| Temp File Location |
|
The Agent operation uses the Temp File Location, but only if it has an assigned value.
|
| Cloud Remediation (Previous File Versions): |
|
By default, the version/revision of the file located in the cloud storage that was searched is deleted after an action is performed.
|
|
Allow Configuration File to Override System Setting |
|
Enable (or prevent) settings in a configuration file to override system settings.
|
|
Target Watcher User Selection* |
|
The end user's service behavior selection. * This is a Sensitive Data Watcher (File and Email Watcher) setting only. |
| Search API Plugins Path (version 13.5 and later) |
|
Full path to custom search plug-ins.
|
|
Disable Integration |
|
Specify whether classifications are editable via integration add-ins.
|
|
Auto Save On Close |
|
Automatically save error reports when the dialog is closed.
|
|
Window Body |
|
The text to display in the body of an error report dialog.
|
|
Window Header |
|
The text to display in the header of an error report dialog window.
|
|
Log Capture Window |
|
The number of days of logs to include when using the Gather Data function
|
|
Max Data Gathering Size |
|
The maximum size - in MB - of the output of the Gather Data function.
|
| Results Storage Mode |
|
Specify how Spirion stores results during a search.
|
| Results Compression |
|
|
|
Plugins (all versions pre-13.5) |
|
Full path to custom search plug-ins.
|
Temp Files
-
The Agent Operation uses the Temp File Location if it has an assigned value.
-
The file location must have a Windows file path and cannot be a mapped network drive.
Set up temp file options for clean-up, either:
-
To begin shredding temp files immediately or delay until the scan is complete.
-
To asynchronously shred temp files, or shred in sync with the scan.
When scanning, compressed files can be downloaded to the Temp File.
-
To save processing time, the compressed file is decompressed one file at a time and the same set of decompressed files are used for each discovered location.
-
The file is not compressed or decompressed again.
-
The Temp File is shredded intermittently to limit space usage and processing time.
-
The settings for the Temp File are in the Scan option selection.
Procedure:
-
Click Next to proceed, Previous to return to the previous screen, or Exit Without Saving
to discard. -
On the Additional Settings screen, you can input additional settings.
-
Expand for more information:
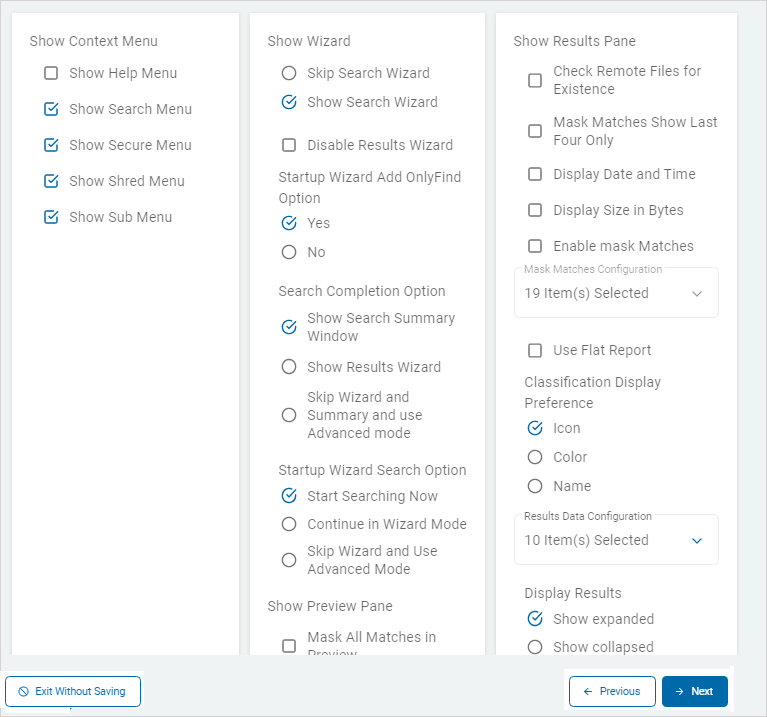
Additional Settings
Use the table below to help you fill in the Additional Settings screen:
| Setting Name | Options | Description |
|---|---|---|
|
Show Help Menu |
|
Show the Help item in the Windows shell extension.
* This option is specific to searches initiated from Windows Agent UI. This is a Windows-only option. Mac/Linux are excluded. |
| Show Search Menu |
|
Show the Search item in the Windows shell extension
* This option is specific to searches initiated from Windows Agent UI. This is a Windows-only option. Mac/Linux are excluded. |
| Show Secure Menu |
|
Show the Encrypt item in the Windows shell extension
* This option is specific to searches initiated from Windows Agent UI. This is a Windows-only option. Mac/Linux are excluded. |
| Show Shred Menu |
|
Show the Shred item in the Windows shell extension
* This option is specific to searches initiated from Windows Agent UI. This is a Windows-only option. Mac/Linux are excluded. |
| Show Sub Menu |
|
Show shell extension items in the Windows sub-menu
* This option is specific to searches initiated from Windows Agent UI. This is a Windows-only option. Mac/Linux are excluded. |
| Show Wizard |
|
Show the Search Wizard when the endpoint application launches in interactive mode.
|
|
Disable Results Wizard
|
|
Disable/Enable the Results Wizard feature
* This option is specific to searches initiated from Windows Agent UI. This is a Windows-only option. Mac/Linux are excluded. |
| Startup Wizard Add OnlyFind Option |
|
Set the default option for OnlyFind in the Search Wizard.
|
| Startup Wizard Search Option |
|
Specify the default option for the Search Wizard (this option has an effect only if the Search Wizard is displayed by setting Use Startup Wizard to "Show Search Wizard").
* This option is specific to searches initiated from Windows Agent UI. This is a Windows-only option. Mac/Linux are excluded. |
| Search Completion Option |
|
Specify the user experience when a search completes.
|
| Mask All Matches in Preview |
|
Mask all matches in preview pane
|
| Check Remote Files for Existence |
|
When selecting a remote file result, check it for existence
|
| Use Flat Report |
|
Present search results in a flat report without a parent/child hierarchy Enable this setting to present search results in a flat report without a parent-child hierarchy.
|
| Classification Display Preference |
|
The style of display for the classification column in the endpoint UI.
|
|
Display Results |
|
Display results collapsed rather than expanded:
* This option is a Windows and Mac option. Linux is excluded. |
| Send Match |
|
Instructs Spirion Agents to send the entire match string of a sensitive data match to the console (as search results).
|
| Send Only Last Four Characters |
|
The setting "Send Match" (described above) must be enabled to activate this setting. The behavior configured in this setting is referred to as "masking." Sensitive data match strings captured by scanning Spirion Agents are returned to the console search results as whole strings, not masked, or else partially masked, as configured in this setting.
|
-
Click Advanced Options to input more detailed options.
-
Expand the section for more information:
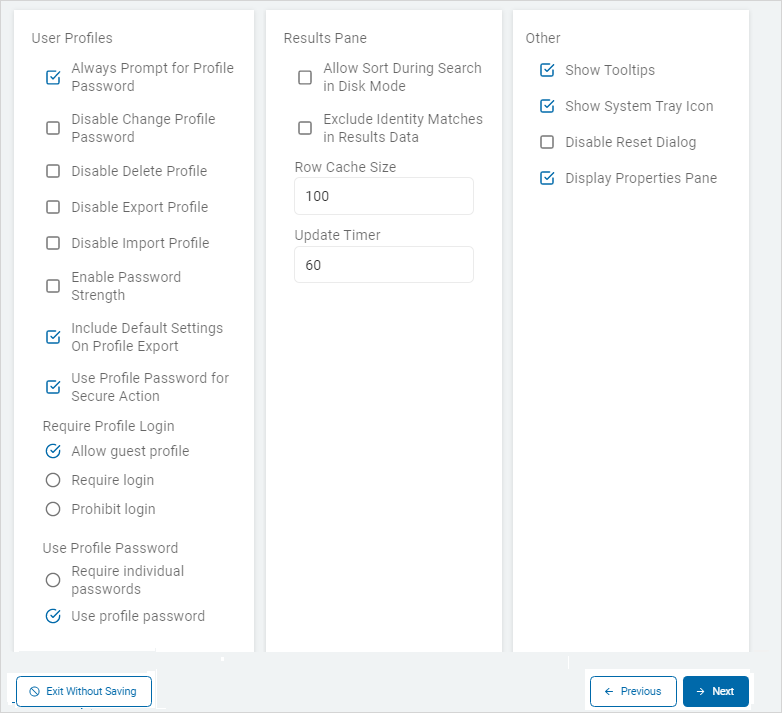
Additional Settings - Advanced Options
Use the table below to help you fill in the Additional Settings - Advanced Options screen:
| Setting Name | Options | Description |
|---|---|---|
| User Profiles | ||
| Always Prompt for Profile Password |
|
Always prompt for Profile Password on start up. When the endpoint starts, the default action is to prompt for the user's Profile Password
|
| Disable Change Profile Password |
|
Disable the ability for users to change their profile password.
|
| Disable Delete Profile |
|
Disable the ability for users to delete their profile.
|
| Disable Export Profile |
|
Disable the export profile button.
|
| Disable Import Profile |
|
Disable the import profile button.
|
| Enable Password Strength |
|
Password strength requirements. Enable this setting to require strong passwords.
*This setting applies to Windows and Mac but not Linux. |
| Include Default Settings on Profile Export |
|
When exporting the profile, include entries for settings that are set to their default value
*This setting applies to Windows and Mac, but not Linux |
| Use Profile Password for Secure Action |
|
Use Profile Password for Encrypt Action
*This setting applies to Windows and Mac, but not Linux. |
| Require Profile Log in |
|
Requirements to log into the Agent. Users can login to the agent using their profile password or skip login and use the guest profile.
Note: This setting cannot be specified in an XML configuration file. *This setting applies to Windows and Mac, but not Linux. |
| Use Profile Password |
|
Use Profile Password for sign on, Encrypt, Open, Save, and other actions that require a password.
*This setting applies to Windows and Mac but not Linux. |
| Use Profile Password for Save |
|
*This setting applies to Windows and Mac but not Linux. |
| Results Pane | ||
| Allow Sort During Search in Disk Mode |
|
Enable sort while searching in on-disk mode. When using the on-disk database to store results during the search rather than holding them in memory, the sort operation can be very slow. Because of this, sort is disabled by default in this scenario.
*This setting applies to Windows and Mac but not Linux. |
| Exclude Identity Matches in Results Data |
|
Exclude matches when collecting results. After a match is found, it is displayed in the results view.
Note: When this setting is enabled, the Redact action cannot be used as the match information is required for redact to operate. Note: If preview is enabled, the first character of the match is highlighted in the Preview pane when a result is selected in the Results pane. *This setting applies to Windows and Mac but not Linux. |
| Row Cache Size |
|
Set the Row Cache Size for on-disk database mode. When using on-disk database mode to store results during the search, the results are batch inserted into the database to manage disk I/O
*This setting applies to Windows, but not Mac/Linux. |
| Update Timer |
|
Specify the timer to write results to disk in on-disk database mode. When using on-disk database mode to store results during the search, the results are batch inserted into the database to manage disk I/O
*This setting applies to Windows, but not Mac/Linux. |
| Other | ||
| Show Tool tips |
|
|
| Show System Tray Icon |
|
Enable the visibility of a system tray icon
*This setting applies to Windows, but not Mac/Linux. |
| Disable Reset Dialog |
|
Disable the ability to reset confirmation dialogs
*This setting applies to Windows, but not Mac/Linux. |
| Display Properties Pane |
|
Display the Properties Pane in the Windows endpoint UI. By default, there is a pane visible at the bottom of the window of the Windows endpoint user interface
|
-
Click Next to proceed, Previous to return to the previous screen, or Exit Without Saving
to discard. -
On the Local Reporting screen, you can input additional settings.
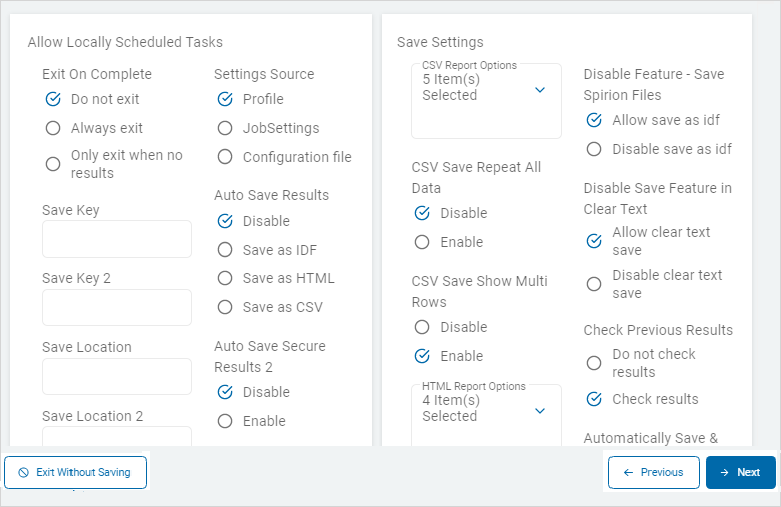
Local Reporting Options
Use the table below to help you fill in the Local Reporting screen.
These settings control report options, paths to configuration files, where to store search results, and other reporting options.
| Setting Name | Options | Description | |||||||||||||||||||||||||||||||||||||||||||||||||||
|---|---|---|---|---|---|---|---|---|---|---|---|---|---|---|---|---|---|---|---|---|---|---|---|---|---|---|---|---|---|---|---|---|---|---|---|---|---|---|---|---|---|---|---|---|---|---|---|---|---|---|---|---|---|
|
Exit on Complete |
|
By default, when the endpoint application is executed as a scheduled task in the context of the logged on user, it remains open and enables the user to interact with those results.
|
|||||||||||||||||||||||||||||||||||||||||||||||||||
|
Save Key |
|
Specify the encrypted password to be used when automatically saving an IDF results file
Note: This value must be created using the endpoint GUI. Reference documentation is available at Creating a Password Hash for Auto Saving Results During Scheduled Task Searches |
|||||||||||||||||||||||||||||||||||||||||||||||||||
|
Save Key 2 |
|
Specify the encrypted password to use when automatically saving a secondary IDF results file
Note: This value must be created using the endpoint GUI. Reference documentation is available at Creating a Password Hash for Auto Saving Results During Scheduled Task Searches |
|||||||||||||||||||||||||||||||||||||||||||||||||||
|
Save Location |
|
The folder path and file name for the saved IDF file.
|
|||||||||||||||||||||||||||||||||||||||||||||||||||
|
Save Location 2 |
|
The folder path and file name for the secondary saved IDF file.
|
|||||||||||||||||||||||||||||||||||||||||||||||||||
| Save Locations Are Folder Names |
|
Specify that the settings Save Folder Location and Save Folder Location 2 are folder names rather than file names.
|
|||||||||||||||||||||||||||||||||||||||||||||||||||
| Settings Source |
|
Specify the location of the settings for the scheduled task.
|
|||||||||||||||||||||||||||||||||||||||||||||||||||
|
Auto Save Results |
|
Enable the ability to automatically save search results.
Note: In Version 7.0.x of the endpoint software, this setting only applies to interactive, user searches and cannot be used with background user searches or system searches. This was updated in version 7.1 to apply to all search types. |
|||||||||||||||||||||||||||||||||||||||||||||||||||
| Auto Save Secure Results 2 |
|
Enable the ability to automatically save results to a secondary file of type IDF.
Note: In Version 7.0.x of the endpoint software, this setting only applies to interactive, user searches and cannot be used with background user searches or system searches. This was updated in version 7.1 to apply to all search types. |
|||||||||||||||||||||||||||||||||||||||||||||||||||
| Configuration File Location |
|
Specify the path to a configuration file
* This option is specific to searches initiated from Windows Agent UI. This is a Windows-only option. Mac/Linux are excluded. |
|||||||||||||||||||||||||||||||||||||||||||||||||||
| Create Folder Location |
|
Automatically create the folder for the saved results file.
|
|||||||||||||||||||||||||||||||||||||||||||||||||||
| Create Folder Location 2 |
|
Automatically create the folder for the secondary saved results file
|
|||||||||||||||||||||||||||||||||||||||||||||||||||
|
CSV Report Options |
Format: Name/(value)/default/Platform (All/Windows/Mac/Linux)
|
The elements and options to save in the Text Export.
|
|||||||||||||||||||||||||||||||||||||||||||||||||||
| CSV Save Repeat All Data |
|
Save all information of each row of the Text Export.
* This option is specific to Windows and Mac. Linux is excluded. |
|||||||||||||||||||||||||||||||||||||||||||||||||||
| CSV Save Show Multi Rows |
|
Save the "Multiple Match" rows in the Text Export
|
|||||||||||||||||||||||||||||||||||||||||||||||||||
| HTML Report Options |
Format: Name/(value)/default/Platform (All/Windows/Mac/Linux)
|
The elements and options to save in the Web Page Report.
|
|||||||||||||||||||||||||||||||||||||||||||||||||||
| HTML Report Type |
|
The options for saved Web Page Report
* This option is specific to Windows and Mac. Linux is excluded. |
|||||||||||||||||||||||||||||||||||||||||||||||||||
|
Spirion Report Options |
|
The elements and options to save in the Encrypted IDF file.
* This option is specific to Windows and Mac. Linux is excluded |
|||||||||||||||||||||||||||||||||||||||||||||||||||
| Disable Feature - Save Spirion Files |
|
Disable the ability save encrypted IDF results files.
* This option is specific to Windows and Mac. Linux is excluded. |
|||||||||||||||||||||||||||||||||||||||||||||||||||
| Disable Save Feature in Clear Text |
|
Disable the ability to save results in clear text
* This option is specific to Windows and Mac. Linux is excluded. |
|||||||||||||||||||||||||||||||||||||||||||||||||||
| Check Previous Results |
|
Automatically check to verify if previous file results exist.
|
|||||||||||||||||||||||||||||||||||||||||||||||||||
| Automatically Save & Load Results |
|
Enable the automatic saving and loading of search results. Beginning with version 6 of the client, by default, results that are visible in the UI are automatically encrypted, saved on exit, and automatically displayed in the endpoint UI when a user opens the endpoint interactively and signs into their profile. The save uses a "machine key" to prevent the opening of the results file on another computer. When the setting "Check Previous Results" is enabled and the endpoint is configured to communicate with the console, file results will be automatically and transparently checked for existence. If the files no longer exist (for example, they were deleted from within Windows Explorer), that information is communicated to the console. In the endpoint UI, the checkbox for the setting "Display previous search results on startup" enables both this setting and the setting "Show Results in Client UI."
|
|||||||||||||||||||||||||||||||||||||||||||||||||||
| Show Results in Client UI |
|
Automatically display previous search results in the endpoint (workstation, laptop, etc.) UI on startup.
* This option is specific to searches initiated from Windows Agent UI. This is a Windows-only option. Mac/Linux are excluded. |
-
Click Next to proceed, Previous to return to the previous screen, or Exit Without Saving
to discard. -
On the Local Logging screen, you can input logging settings.
-
Expand the section for more information:
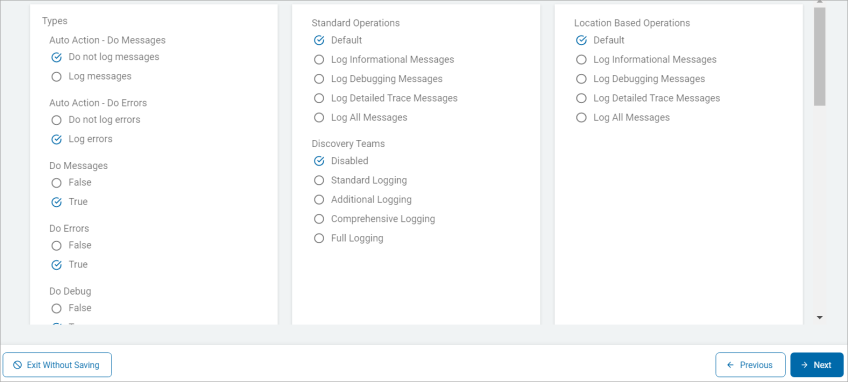
Local Logging Options
Use the table below to help you fill in the Local Logging screen:
These settings control where and how to log informational and error messages as well as how to create new logs, log user actions, and set log formats. The level of detail to log is configured here.
| Setting Name | Options | Description | |||||||||||||||||||||||||||||||||
|---|---|---|---|---|---|---|---|---|---|---|---|---|---|---|---|---|---|---|---|---|---|---|---|---|---|---|---|---|---|---|---|---|---|---|---|
| Types | |||||||||||||||||||||||||||||||||||
| Auto Action - Do Messages |
|
This setting controls logging informational messages when performing auto-actions.
|
|||||||||||||||||||||||||||||||||
| Auto Action - Do Errors |
|
This setting controls logging error messages when performing auto-actions.
|
|||||||||||||||||||||||||||||||||
| Auto Action - Do Action |
|
This setting controls logging user actions when performing auto-actions.
|
|||||||||||||||||||||||||||||||||
| Do Messages |
|
This setting controls logging informational messages.
|
|||||||||||||||||||||||||||||||||
| Do Errors |
|
This setting controls logging error messages.
|
|||||||||||||||||||||||||||||||||
| Do Debug |
|
This setting controls logging debug messages.
|
|||||||||||||||||||||||||||||||||
| Do Secure Items Skipped |
|
This setting controls logging items skipped because they were secure.
|
|||||||||||||||||||||||||||||||||
| Enable Logging |
|
The setting for logging information when performing updates
* This option is specific to searches initiated from Windows Agent UI. This is a Windows-only option. Mac/Linux are excluded. |
|||||||||||||||||||||||||||||||||
| Retention |
|
This setting controls the method for creating new logs.
|
|||||||||||||||||||||||||||||||||
| Do Locations Searched |
|
This setting controls logging each location searched.
|
|||||||||||||||||||||||||||||||||
| Do Matching Locations |
|
This setting controls logging each location with a match.
|
|||||||||||||||||||||||||||||||||
| Do User Actions |
|
This setting controls logging user actions:
|
|||||||||||||||||||||||||||||||||
| Log Format |
|
This setting controls the format for the logs.
|
|||||||||||||||||||||||||||||||||
| Log Types |
|
This setting controls log message types read by the console.
|
|||||||||||||||||||||||||||||||||
| Send Logs |
|
This setting controls sending logs to the console.
|
|||||||||||||||||||||||||||||||||
| Standard Operations |
|
When using Sensitive Data Watcher's Email component (internally email change monitor service), it may be desirable to see detailed logging information during configuration or troubleshooting.
The following log levels are available:
Note: Logging beyond the default level, especially the maximum level, creates very large log files and may contain sensitive information. |
|||||||||||||||||||||||||||||||||
| Discovery Teams |
|
This setting controls the level of detail to log when searching with Discovery Teams.
The following log levels are available:
*This setting applies Windows and Linux. Mac OS is excluded. |
|||||||||||||||||||||||||||||||||
| Location Based Operations |
|
This setting controls the level of detail to log when an Agent acting upon a location (example: c:\private files\psswd\passwordstxt) such as scanning, remediation, etc. If an error is thrown when trying to scan a specific file, set one of the following log levels:
Note: Logging beyond the default level, especially the maximum level, may create very large log files and may contain sensitive information. |
|||||||||||||||||||||||||||||||||
-
Click Advanced Options to input more detailed options.
-
Expand the section for more information:
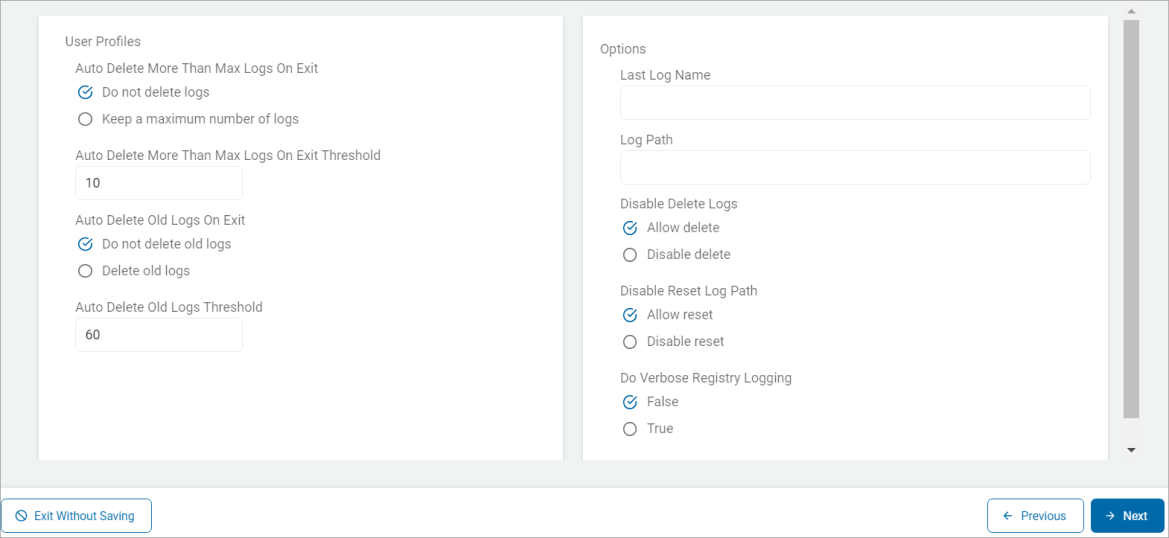
Local Logging - Advanced Options
Use the table below to help you fill in the Local Logging - Advanced Options screen.
These settings control advanced logging options such as: how many endpoint service logs to keep, when to automatically delete endpoint service logs, how long to retain logs, the path for saved log files, whether a new log must be created, controls for deleting existing logs, and logging for registry search.
| Name | Options | Description |
|---|---|---|
| Auto Delete More Than Max Logs on Exit |
|
Keep only a specified number of endpoint service logs
|
| Auto Delete More Than Max Logs On Exit Threshold |
|
The number of endpoint logs to retain.
|
| Auto Delete Old Logs On Exit |
|
Automatically delete endpoint service logs older than a specified number of days.
|
| Auto Delete Old Logs Threshold |
|
The number of days to retain endpoint service logs.
|
| Last Log Name |
|
The name of the previous log file.
|
| Log Path |
|
The path for saved log files.
|
| Disable Delete Logs |
|
Disable the use of the Clear Logs buttons to delete existing logs.
|
| Disable Reset Log Path |
|
Disable the use of the Use Default button to reset the log path.
|
| Do Verbose Registry Logging |
|
Specify additional logging for the registry search.
|
-
Click Next to proceed, Previous to return to the previous screen, or Exit Without Saving
to discard. -
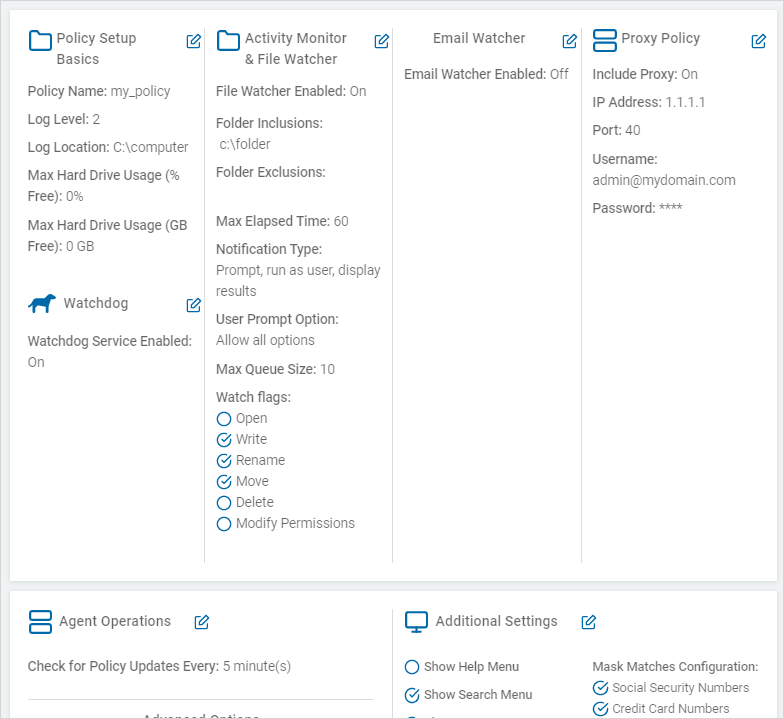
On the first Review Policy screen you can review policy settings for the below sections.
-
Click the pencil icon (
 ) to edit any of the sections:
-
Policy Setup Basics
-
Activity Monitor & File Watcher
-
Email Watcher
-
Proxy Policy
-
Agent Operations
-
Additional Settings
-
Advanced Options
-
-
Click Next to proceed, Previous to return to the previous screen, or Exit Without Saving
to discard. -
On the second Review Policy screen, you can review policy settings for the below sections.
-
Click the pencil icon (
 ) to edit any of the sections:
-
Policy Setup Basics
-
Agent Operations
-
Additional Settings
-
Local Reporting
-
Local Logging
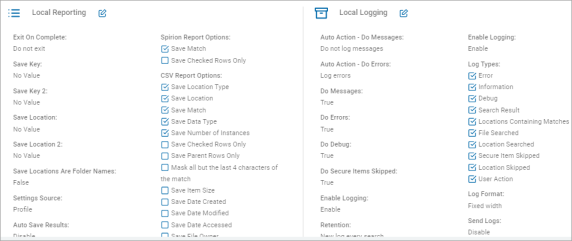
-
-
Click Finish & Save to save the policy, Previous to return to the previous screen, or Exit Without Saving to discard.
Edit a Policy
To edit a Policy, use the following steps:
-
Click the Policy Configuration drop-down list, locate and click the policy you want to edit.

-
Click Edit this Policy.
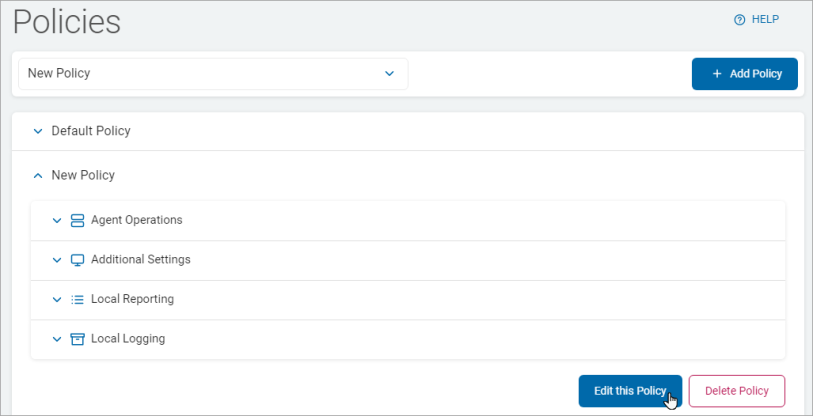
-
Make needed changes to each section. See Add a New Policy for more information.
-
Policy Setup Basics
-
Agent Operations
-
Agent Operations - Advanced Options
-
Additional Settings
-
Additional Settings - Advanced Options
-
Local Reporting
-
Local Logging
-
Review Policy Settings 1
-
Review Policy Settings 2
-
-
Review the policy changes, and then click Save to save the changes or Exit Wizard to discard.
Delete a Policy
To delete a Policy, do the following:
-
Click the Policy Configuration drop-down list, locate and click the policy you want to delete.
-
Click Delete Policy.
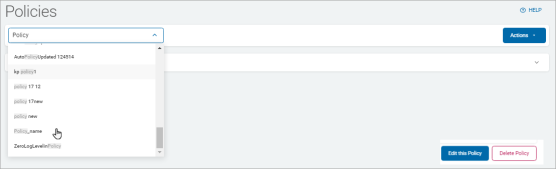
-
On the Delete Policy pop-up window, click Confirm to delete the policy or else click Cancel.